

Install Guide
Bluemax NGF
Create Administrator Account
Create a dedicated administrator account for Logpresso connection on the Bluemax NGF device.
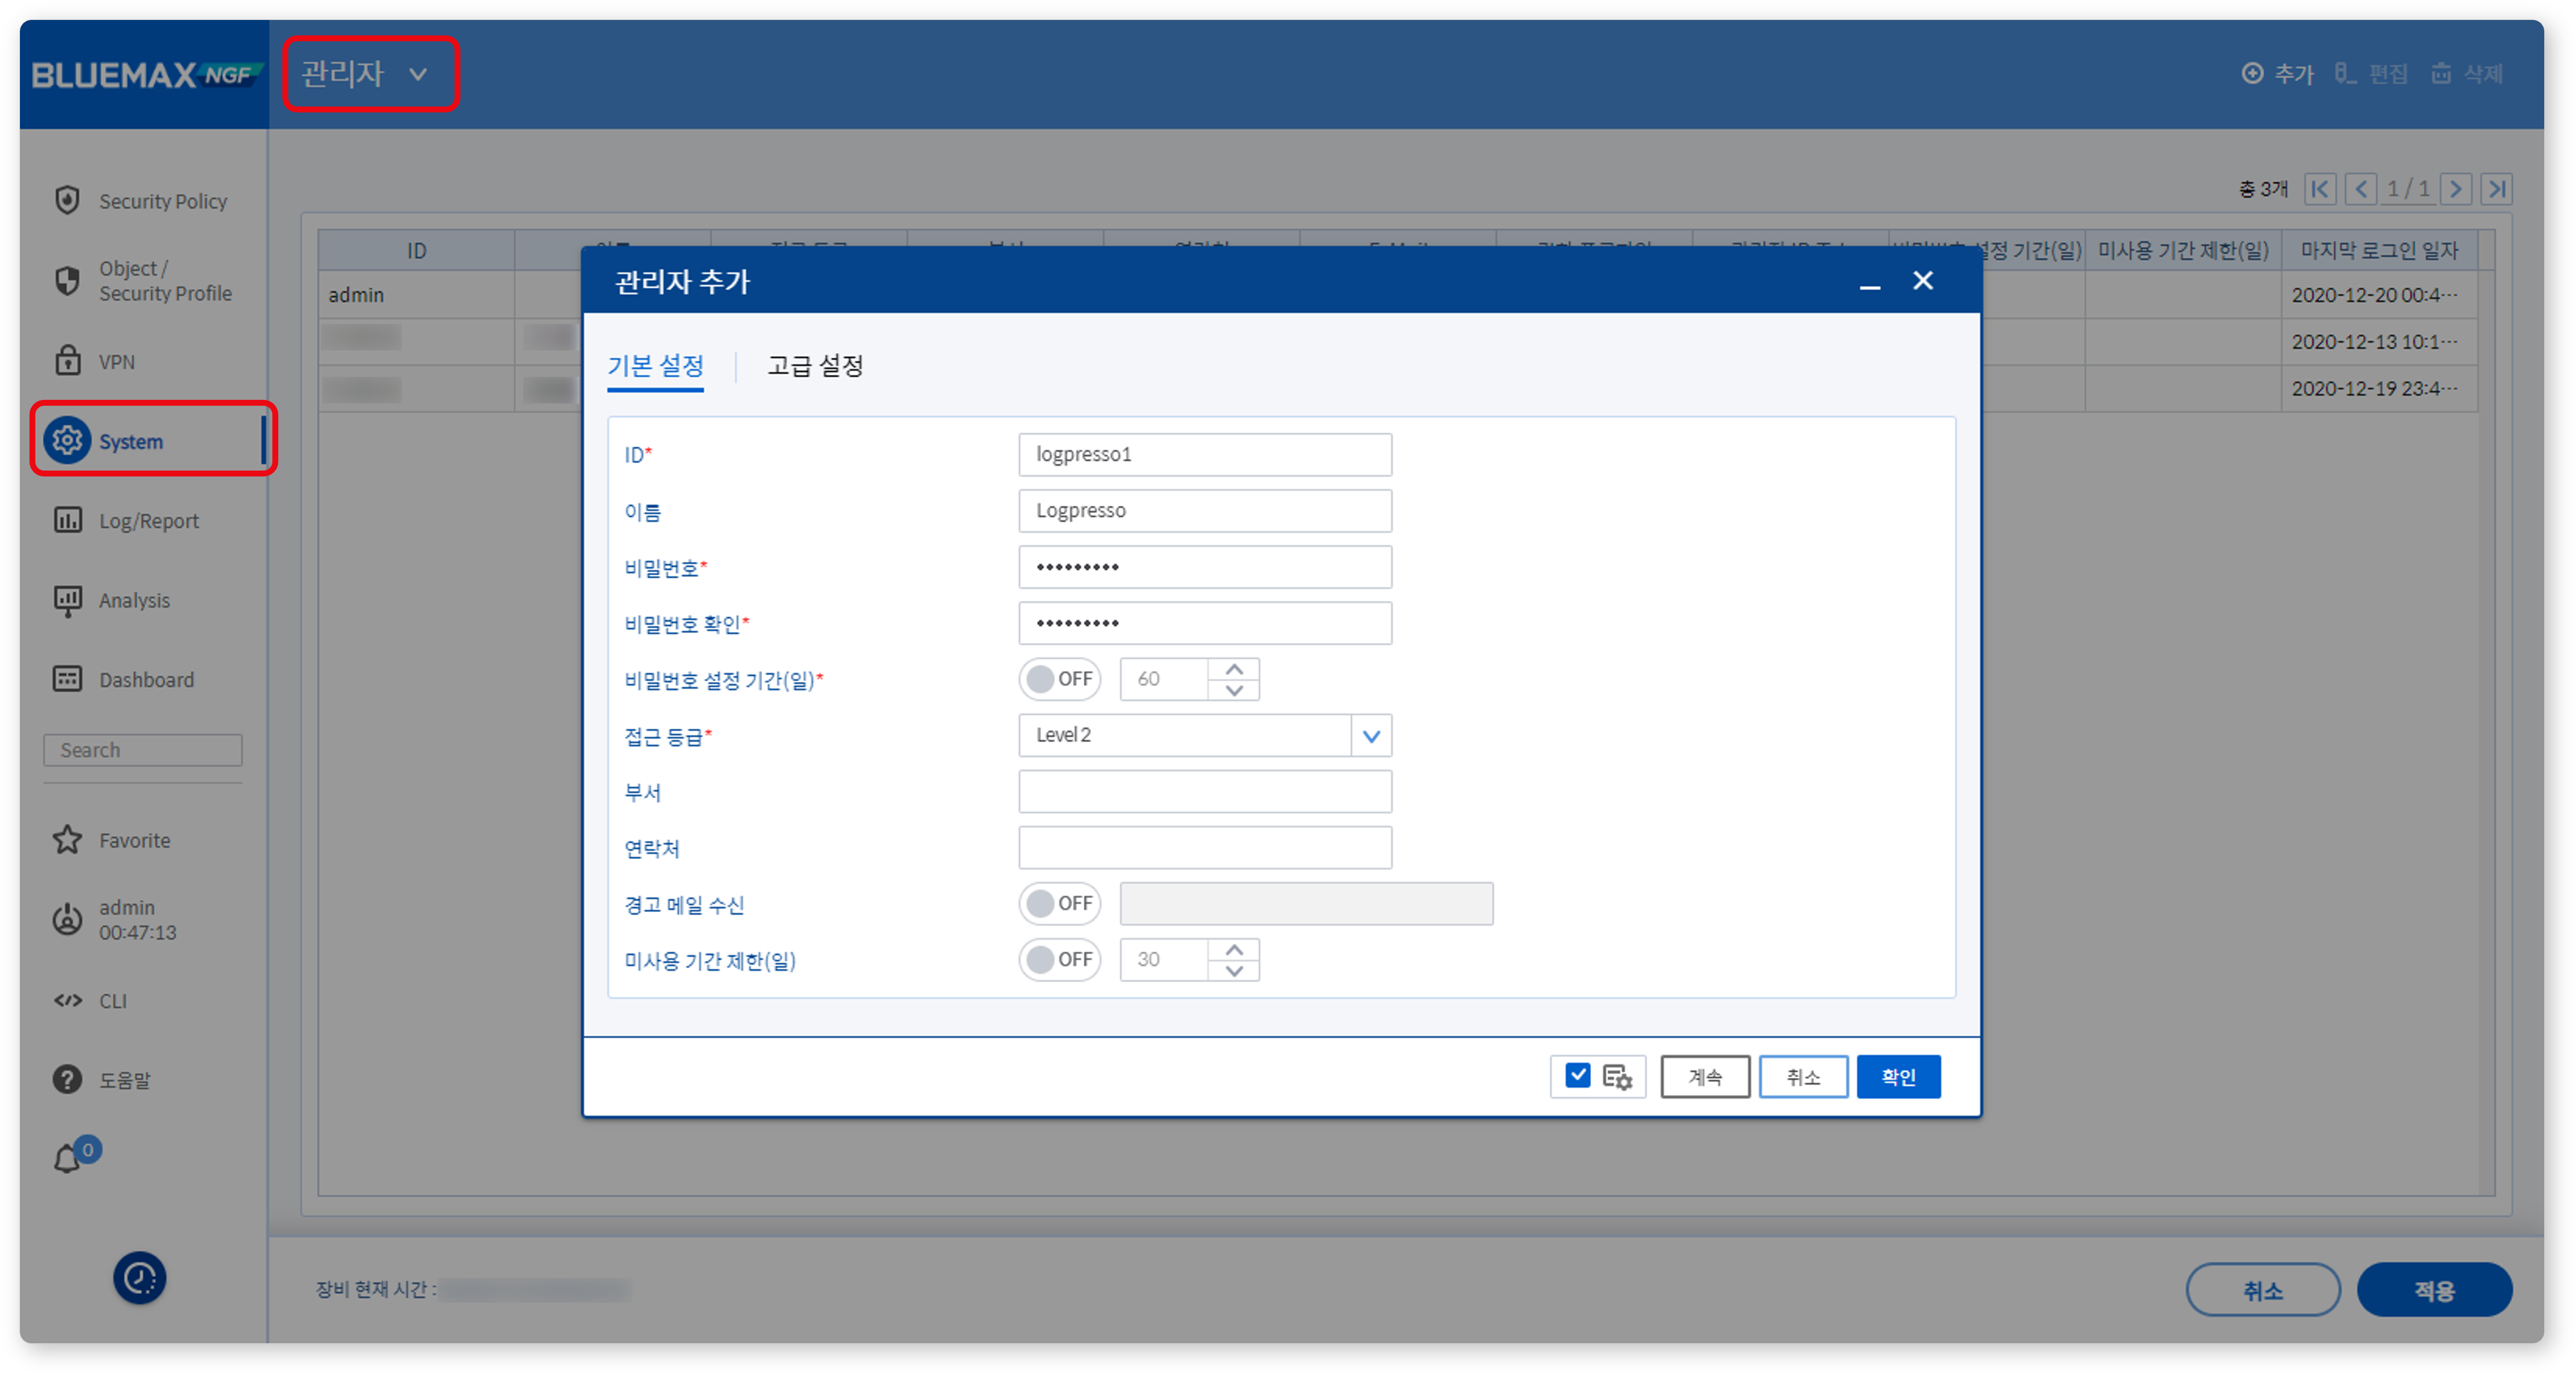
- ID: Must contain a mix of letters and numbers.
- Access Level: Select Level 2 (allows administrative functions excluding system shutdown and restart).
Generate API Key
-
Log in with the dedicated Logpresso account, then click the account ID from the left menu.
-
In Edit Administrator > Advanced Settings, enable External Client Integration and click Settings.
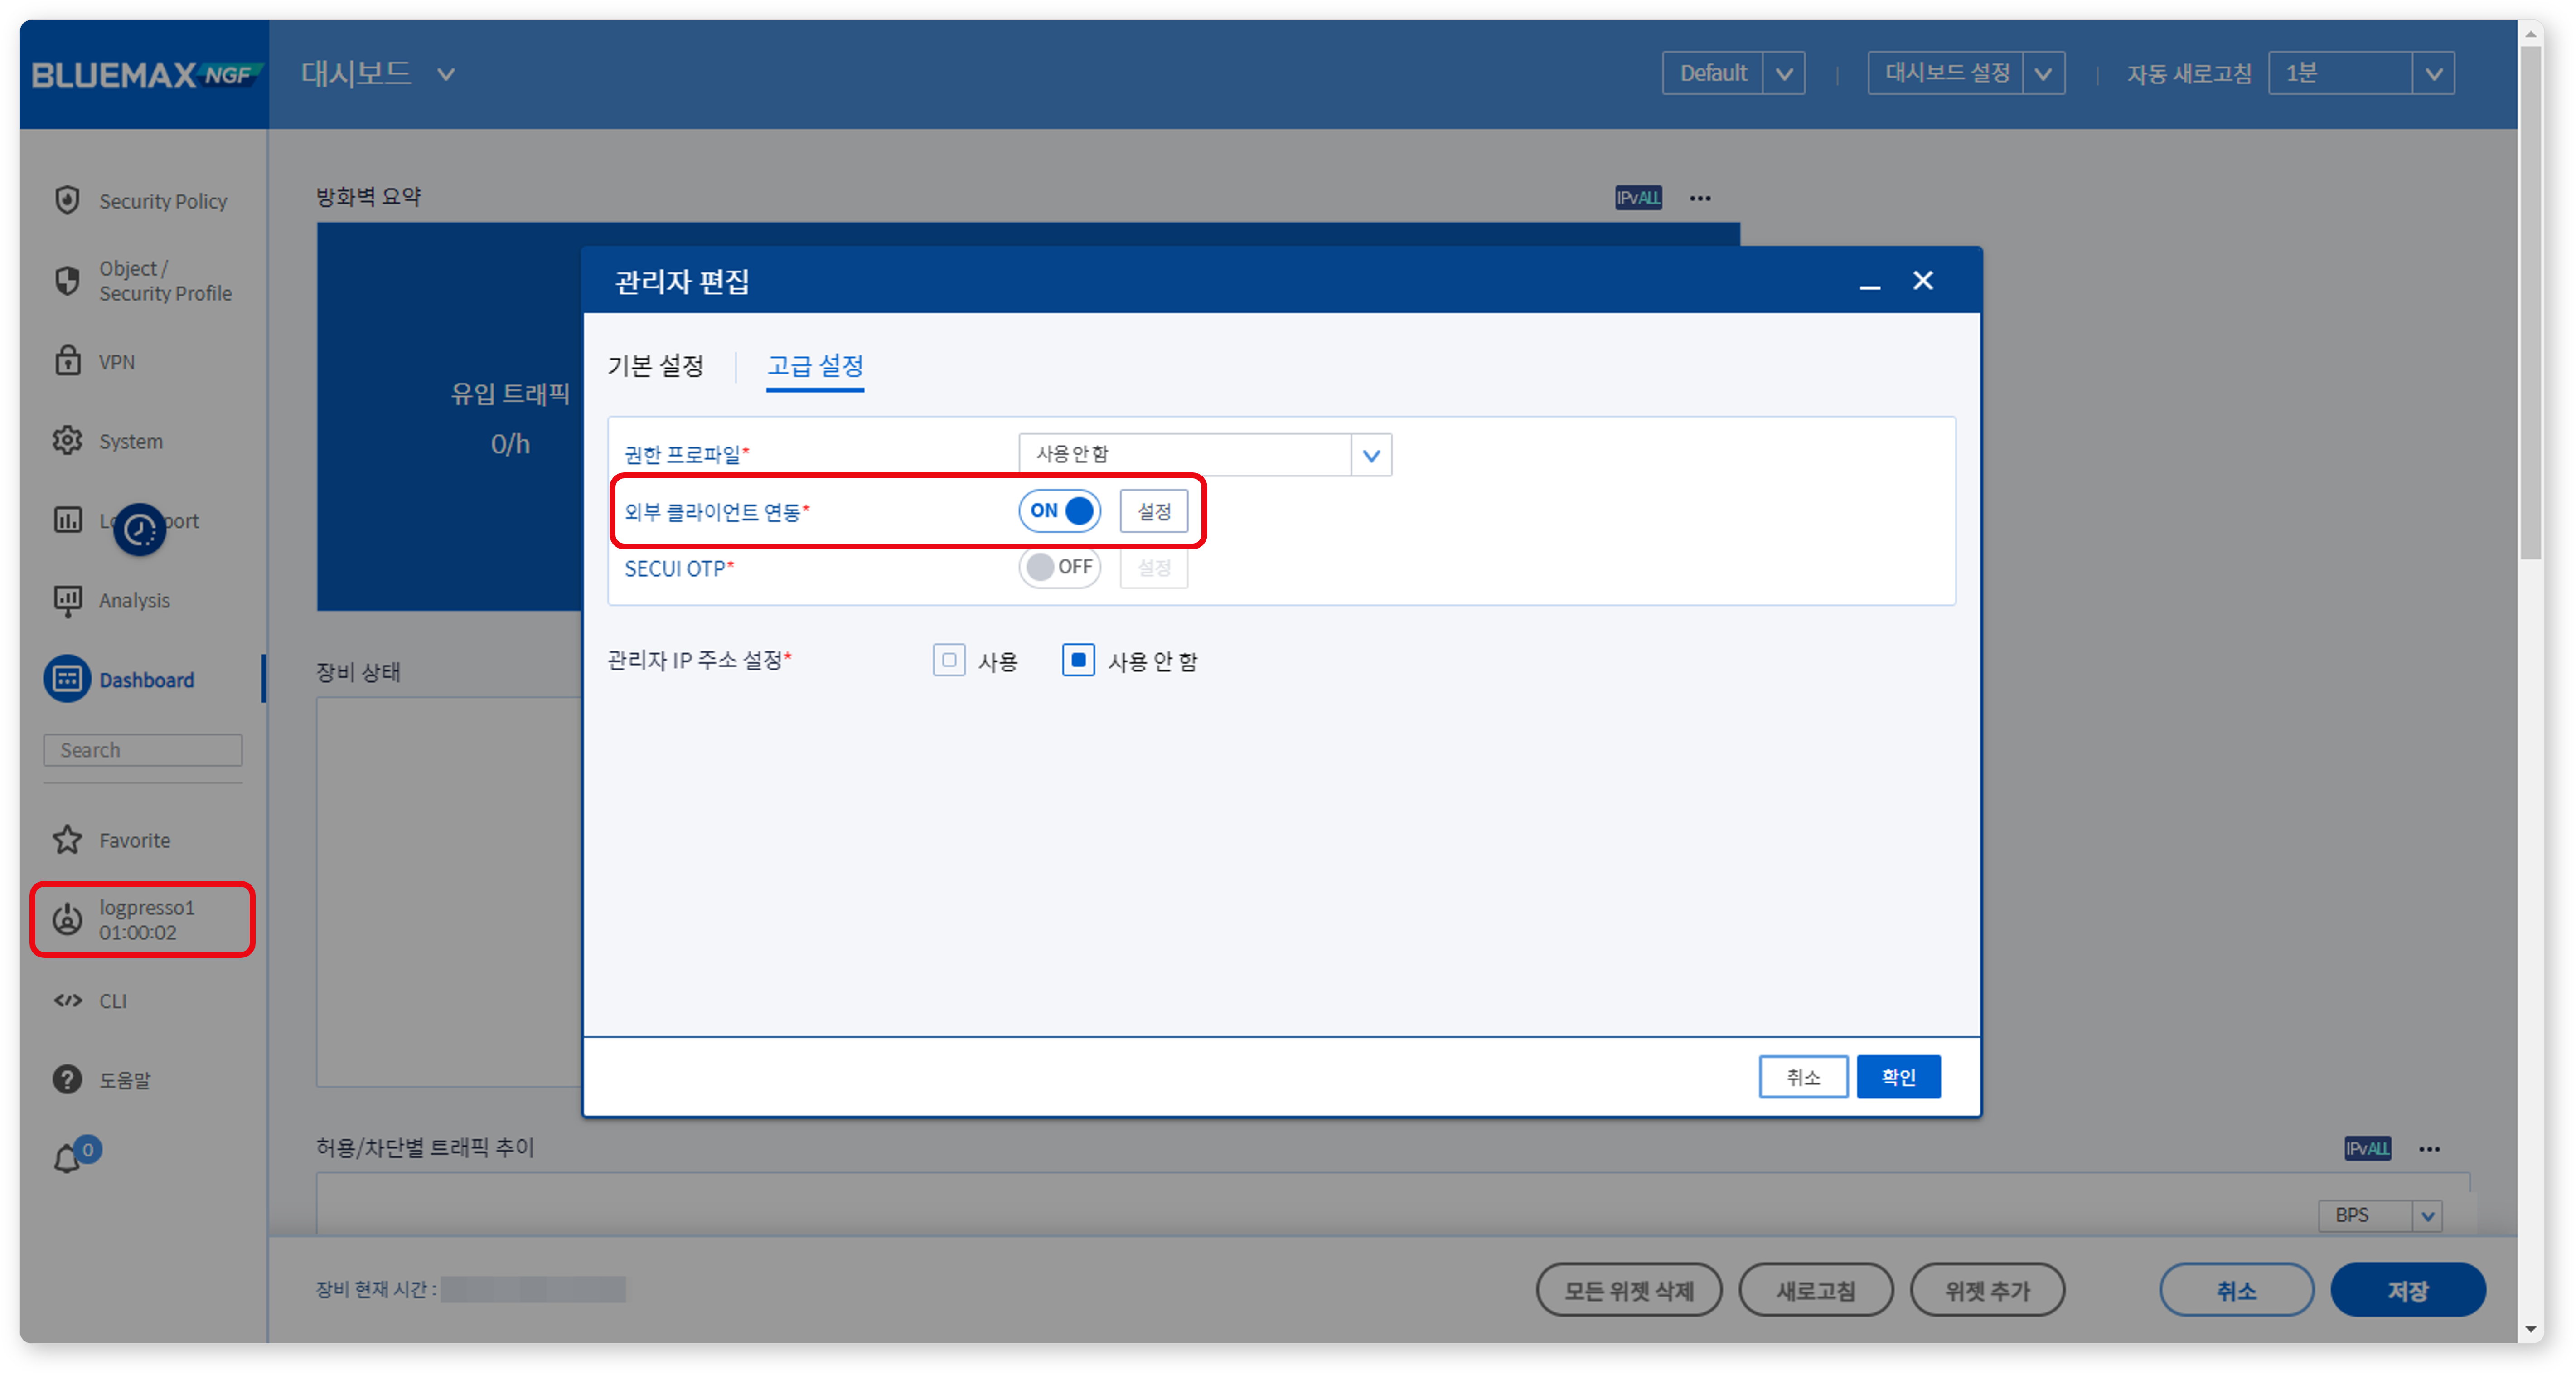
-
Click Regenerate to generate the Client ID and Client Secret. Store them securely.
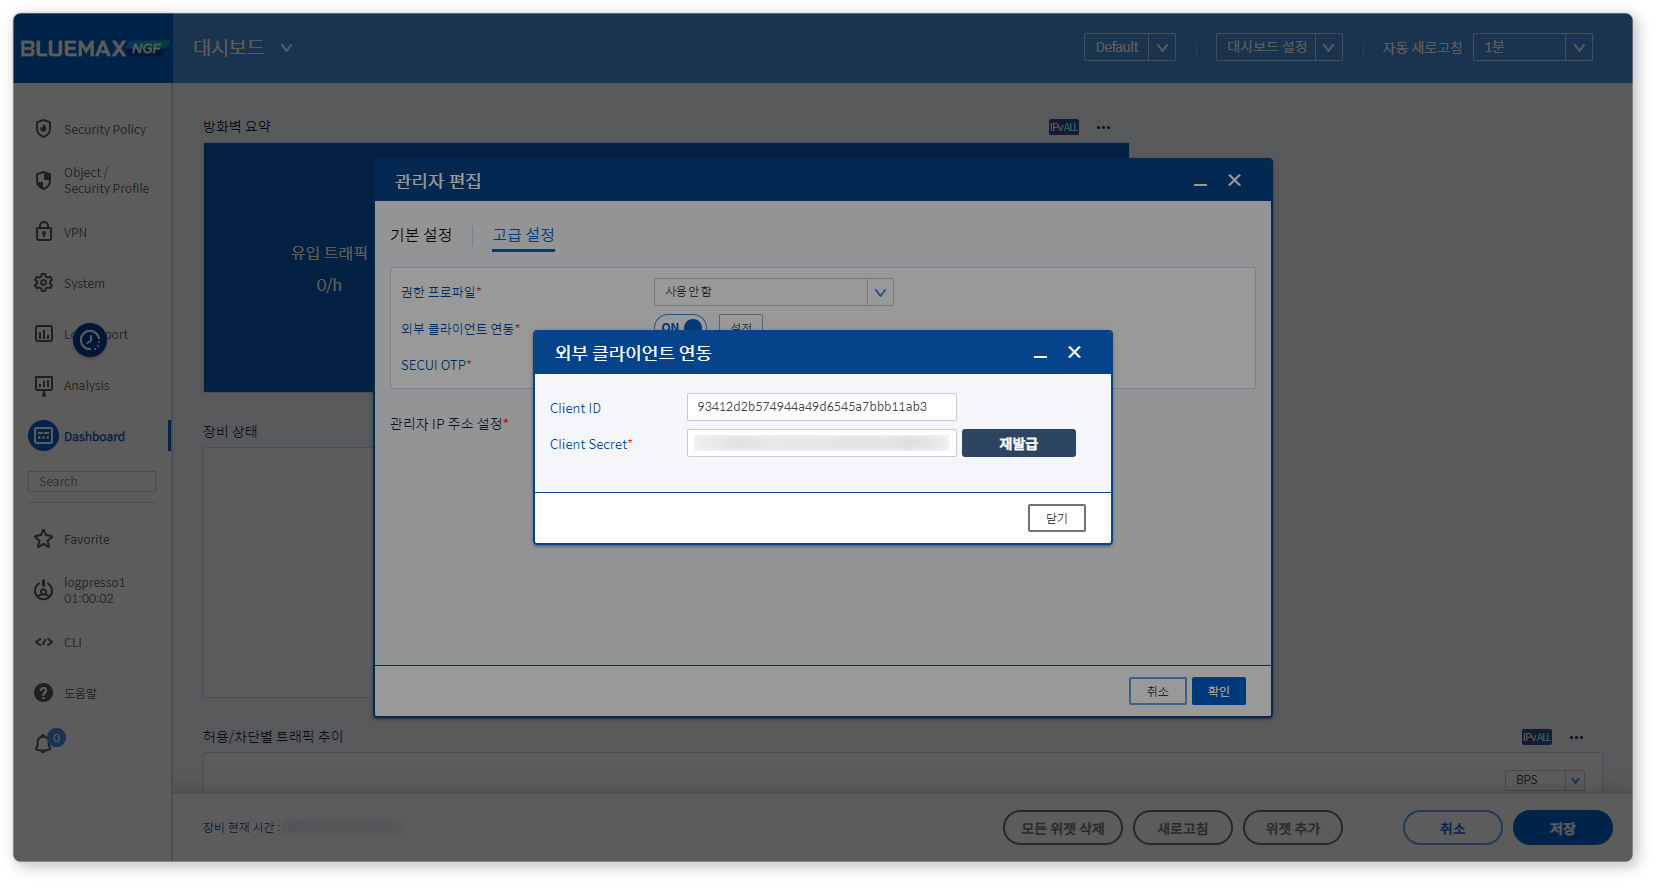
-
Click OK to close the settings window and log out.
Add Address Group
If you want to integrate using address group synchronization (instead of blocklist sync):
- Go to Object/Security Profile > Address Objects.
- Click Group Objects, then Add from the toolbar.
- Enter the required properties and click OK.
- Group Name: Unique address group name (e.g., Logpresso)
- Zone: External
- Included Objects: Add at least one dummy object to create the group.
Logpresso
Configure Connection Profile
Refer to this guide to add a connection profile.
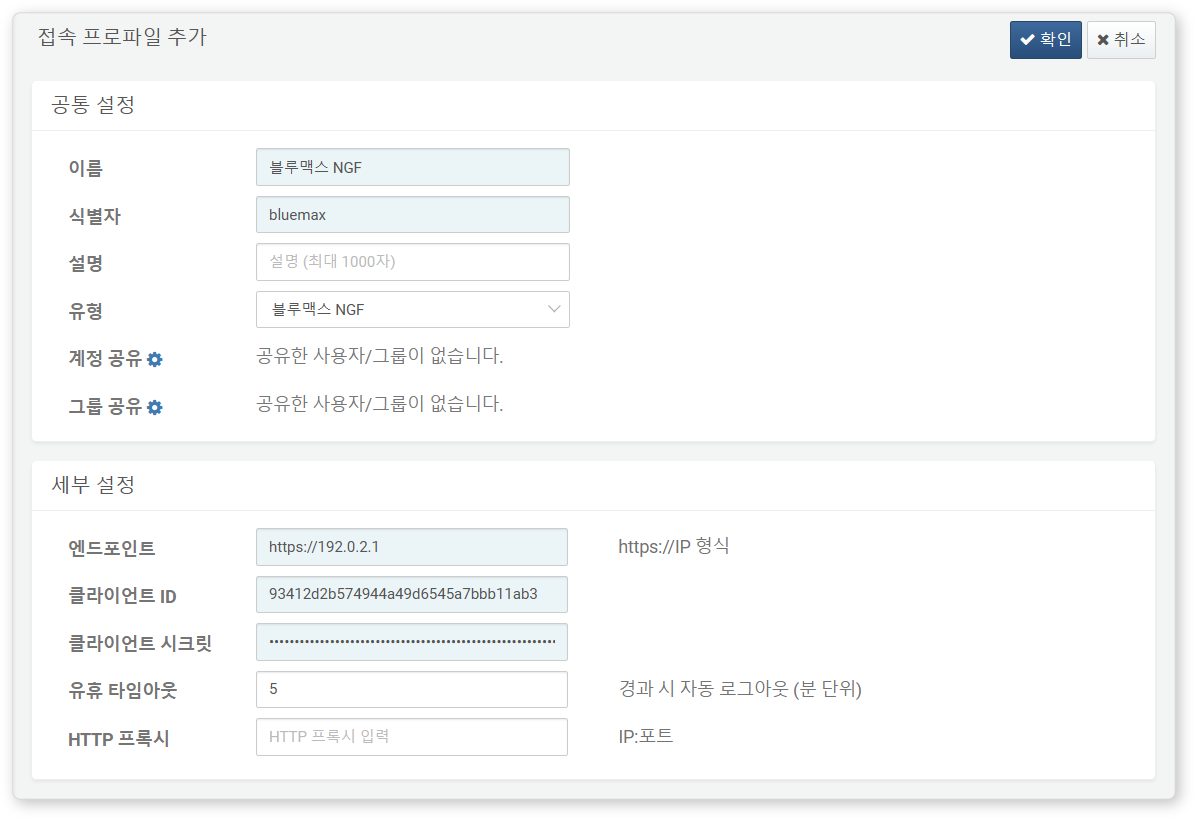
Required fields are highlighted in light blue:
- Name: Unique name for the profile
- Code: Used in queries
- Type: Bluemax NGF
- Endpoint: Bluemax NGF API endpoint in the format https://IP
- Client ID: Client ID from Bluemax NGF API key
- Client Secret: Client secret from Bluemax NGF API key
- Idle Timeout: 5 minutes (optional, for auto-logout of inactive sessions)
After configuration, you can use Bluemax NGF extended commands in queries and playbooks.
Configure Block Integration
To automatically block detected attacker IPs, refer to this guide.
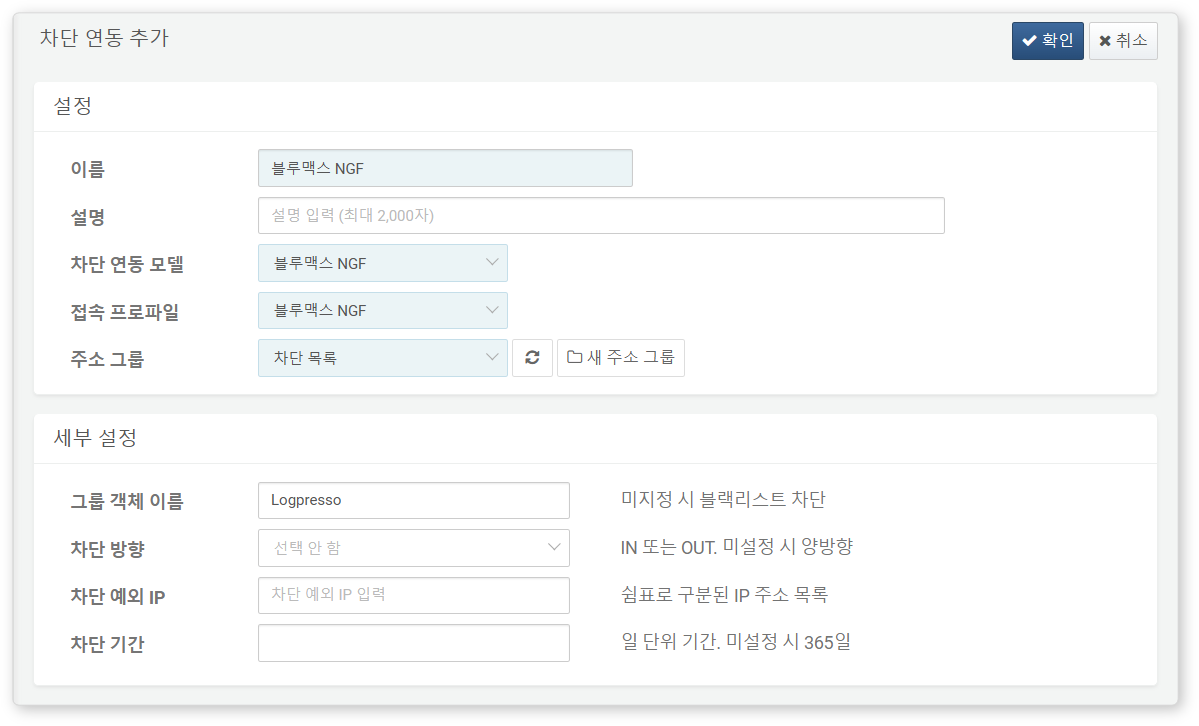
Required fields are highlighted in light blue:
- Name: Unique name for the block integration
- Response Model: Bluemax NGF
- Connection Profile: Bluemax NGF connection profile
- Address Group: Select or create an address group.
- Group Object Name: Leave empty to sync with the blocklist, or Enter the group object name (e.g., Logpresso) to sync with am address group
- Traffic Direction: Select IN, OUT, or BOTH (default: BOTH)
- **Exception IPs:
- Enter the Exception IPs as a comma-separated list to prevent accidental blocking of critical asset IP addresses and avoid service disruptions.
- Recommended to add firewall management IPs
- Block Duration: Duration in days (default: 365)
We recommend using blocking integration only when managing the entire blacklist lifecycle exclusively through address groups.
When using the group object method, the blocking duration does not apply.
When you add an IP address to Logpresso's IP blocklist, it will sync automatically to the Bluemax NGF device's blacklist policy or address group.
If you specify a group object name, configure a firewall rule on Bluemax NGF to block IPs using the Logpresso group object.
You can also configure detection rules to automatically add attacker IPs to the blocklist when threats are detected, or manually add source or destination IPs from a ticket to the blocklist, allowing immediate firewall blocking of threat IPs.
Configure Logger
Refer to this guide to configure a logger. The default dashboards and datasets reference tables that start with FW_BLUEMAX.
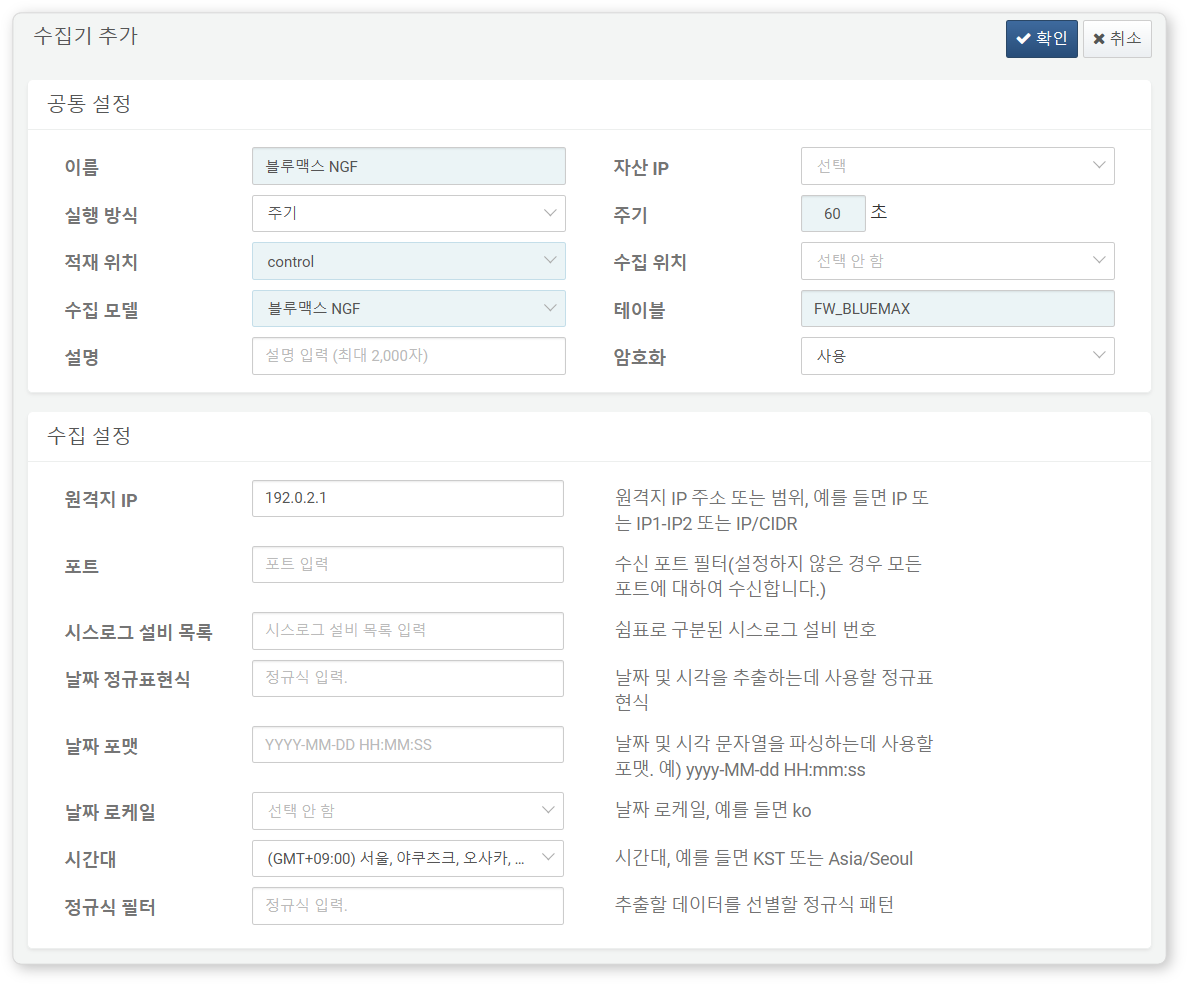
Required fields are hioghlighted in light bluee:
- Name: Unique name for the logger
- Interval: 60 seconds
- Storage: Select an appropriate node based on your Logpresso platform configuration.
- Logger Model: Bluemax NFG
- Table: Table name starting with FW_BLUEMAX
- Remote IP: IP address of the Bluemax NGF device sending logs
Once completed, Bluemax NGF logs will start collecting, and dashboards will update.