Install Guide
Prerequisites
Verify Customer ID
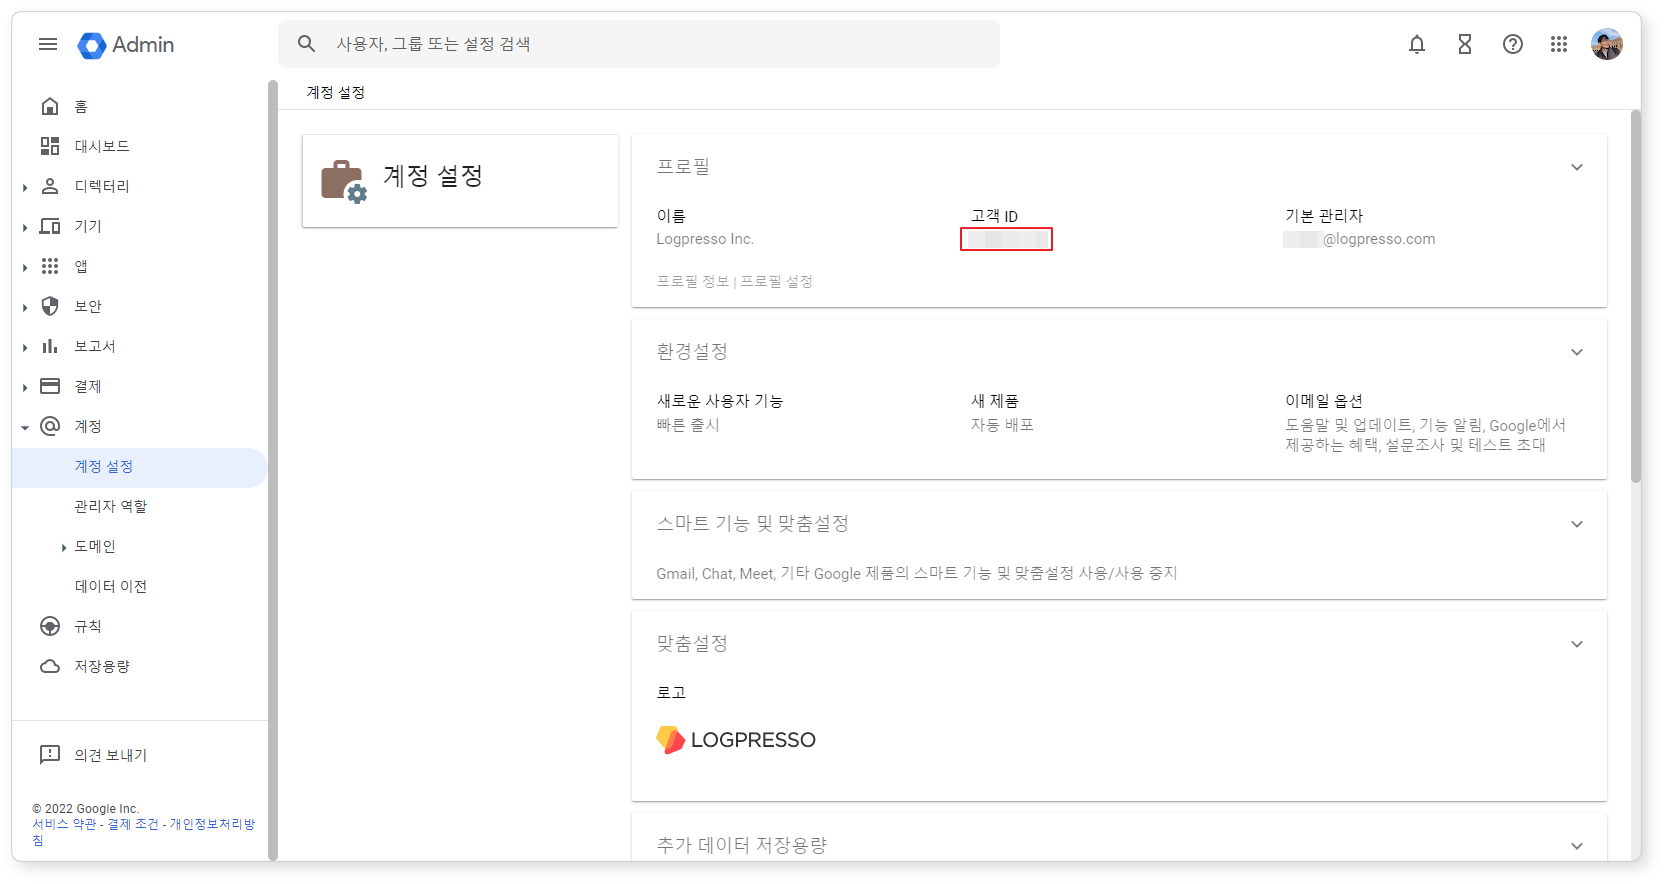
To configure the connection profile for the Google Workspace app, you need the Customer ID from Google Workspace.
-
Log in to the Google Workspace Admin Console.
-
Navigate to Account > Account Settings and note down the Customer ID.
Create an Admin Role
The extended commands for the Google Workspace app require admin privileges. Create an administrator role with the necessary permissions for the Google Workspace app.
-
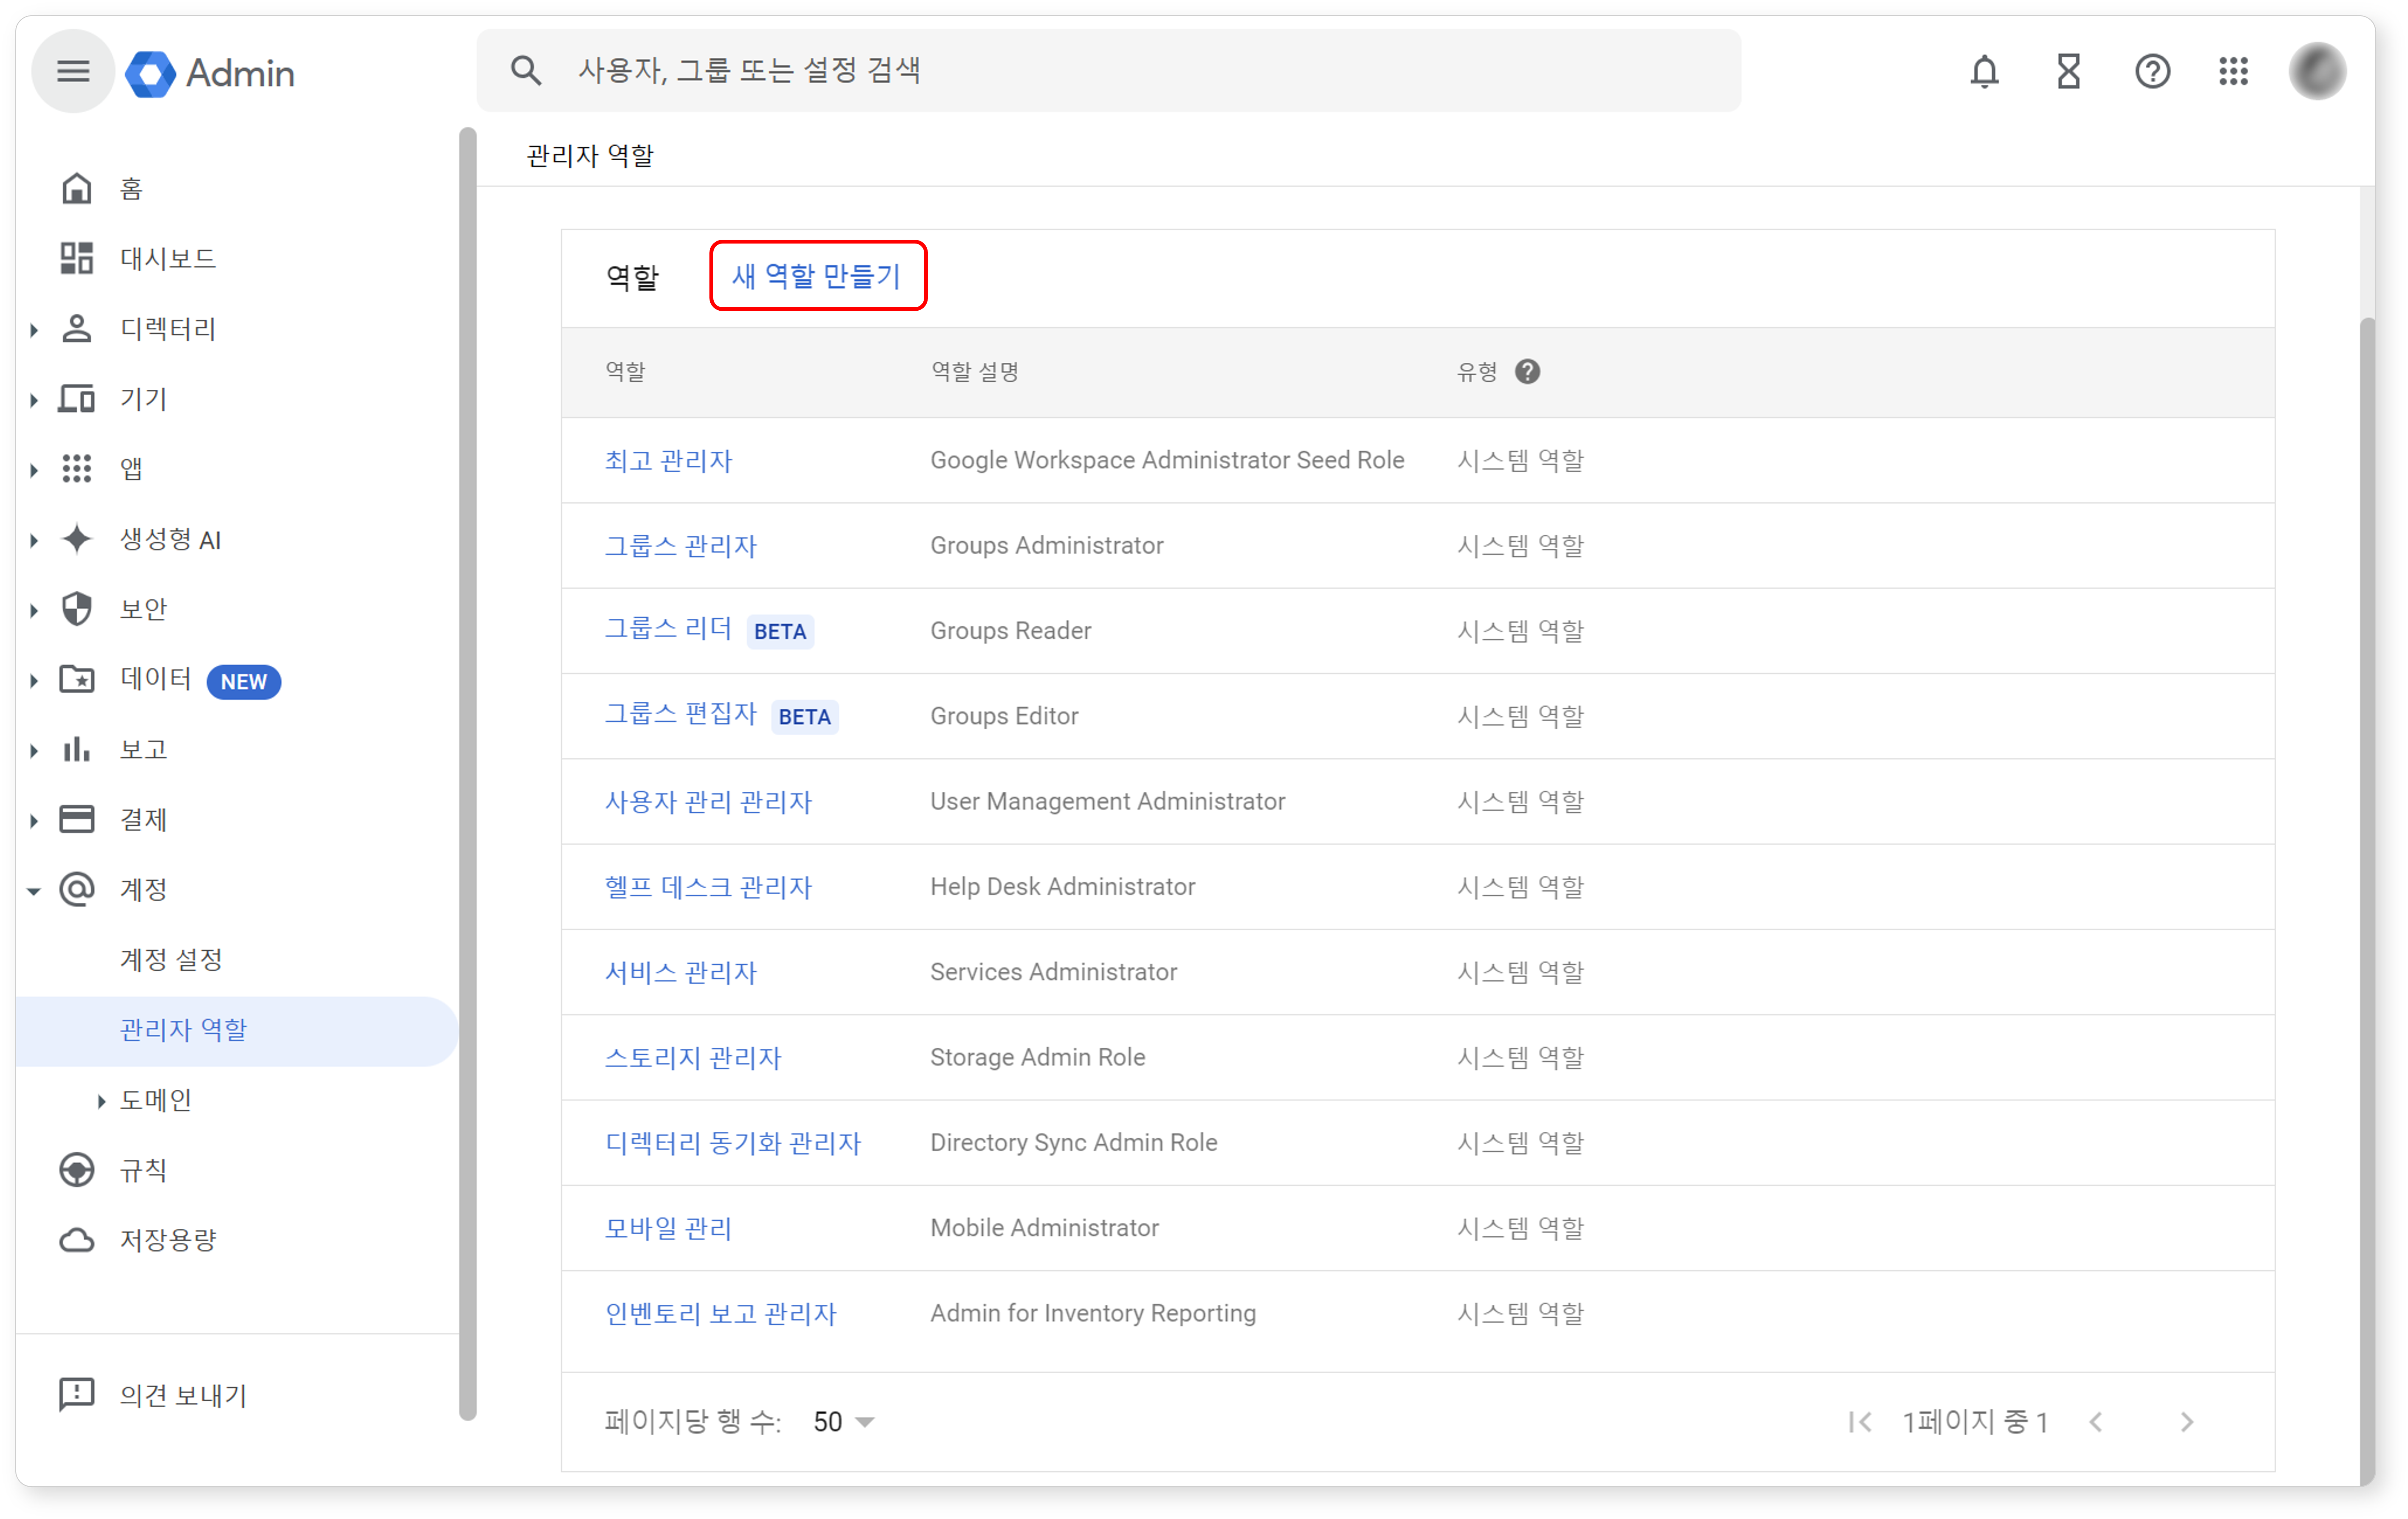
In Account > Admin Roles, click the Create new role button.
-
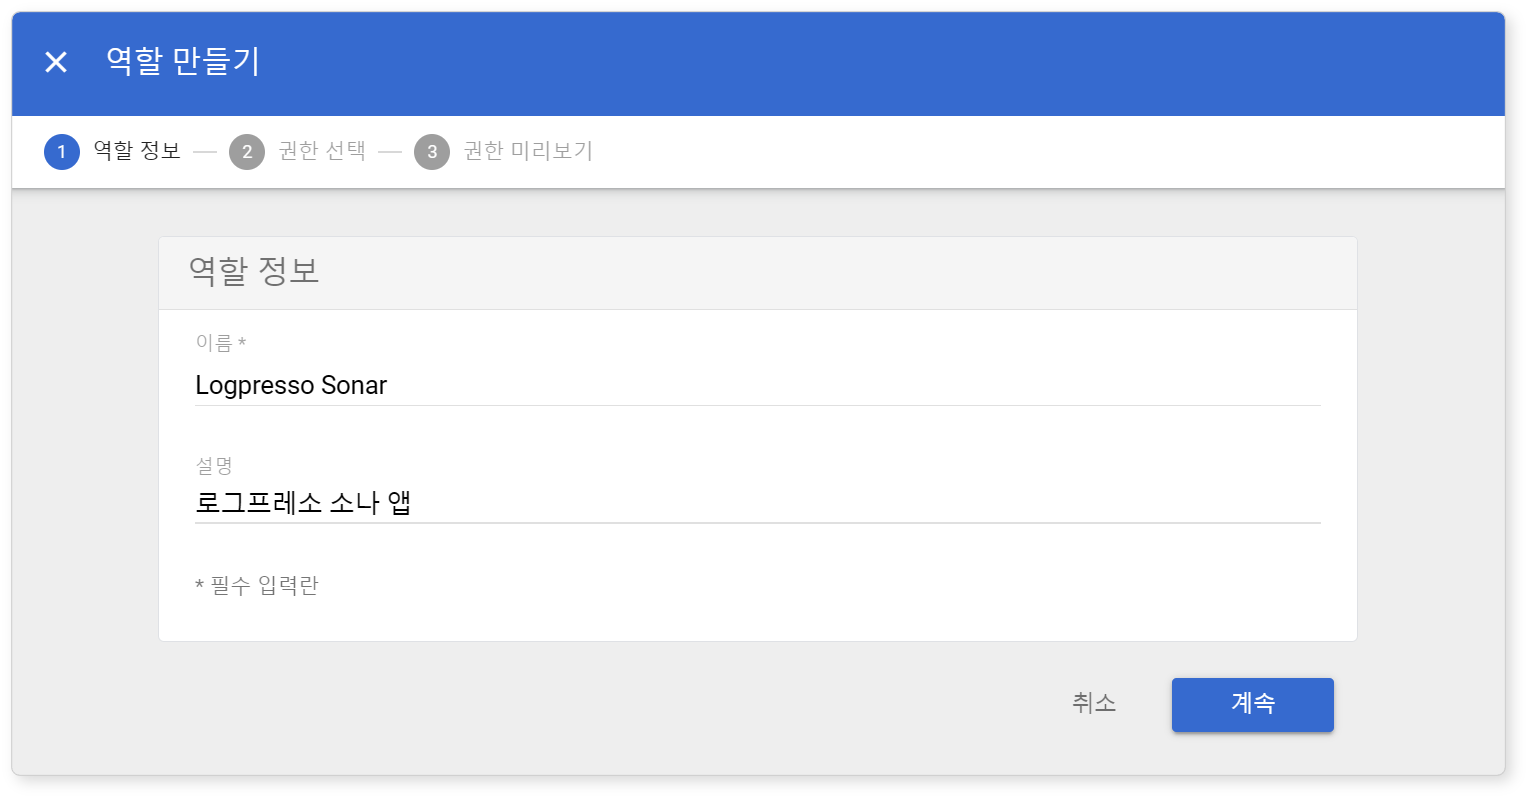
Enter the Role Info. You can specify the Name (required) and Description (optional) as desired. Once completed, click the Continue button.
-
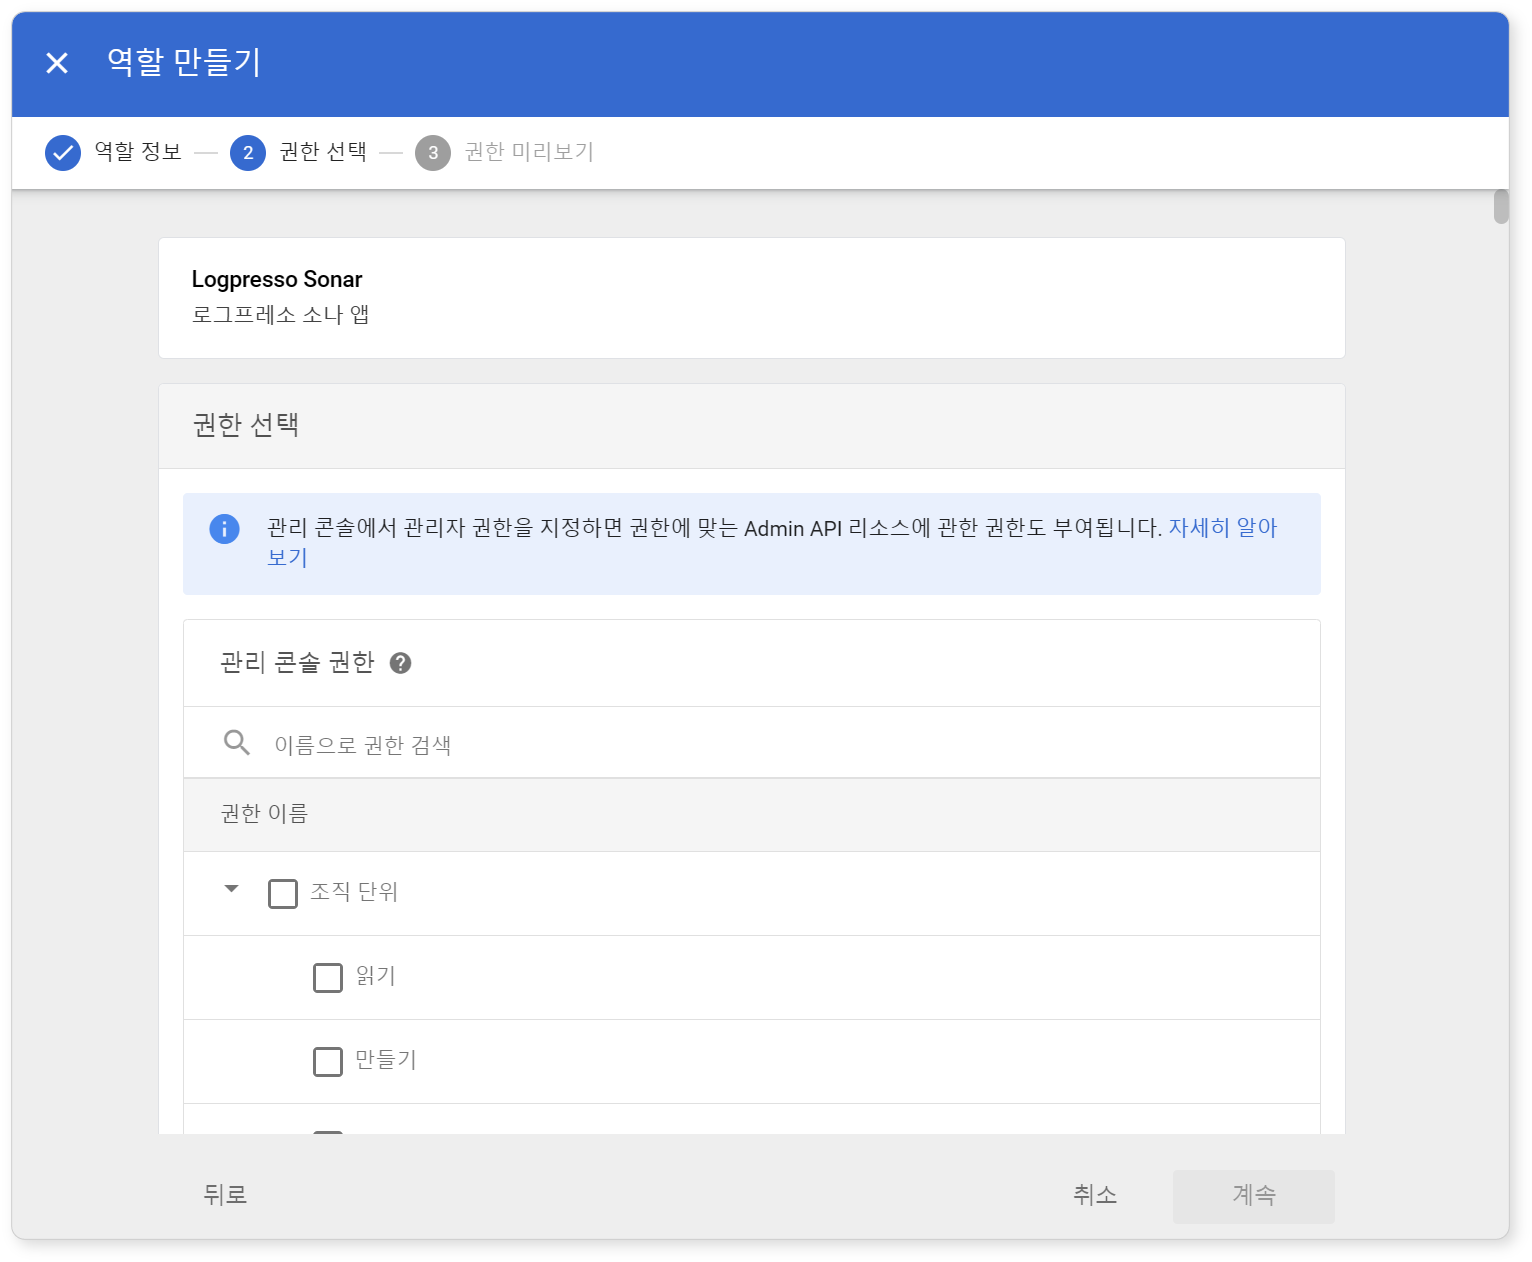
Check the required permissions and click the Continue button.
Refer to the table below for the required permissions:
Permission Related Extended Command Console Permissions > Services > Alert Center > Full Access > View Access google-workspace-alerts Console Permissions > Domain Settings google-workspace-domains Console Permissions > Reports google-workspace-logs, google-workspace-meet-logs, google-workspace-sheets-values, google-workspace-write-values, google-workspace-admin-logs, google-workspace-login-logs API Controls > Domains google-workspace-domains API Controls > Users > Read permission google-workspace-users Note
Selecting the permissions listed above will also automatically include the following additional permissions:
- (Console Permissions) Domains
- (API Permissions) Customer Management > Customer Read Permission > Read Customer Branding Settings, Onboarding Settings, Profile Settings, Support Settings, and Time Zone Settings
- (API Permissions) Customer Management > Customer Update Permisson > Update Customer Branding Settings, Update Onboarding Settings,Update Profile Settings, Update Support Settings, and Update Time Zone Settings
- (API Permissions) Billing > Read Billing Statements
-
Review the granted permissions and click the Create role button.
-
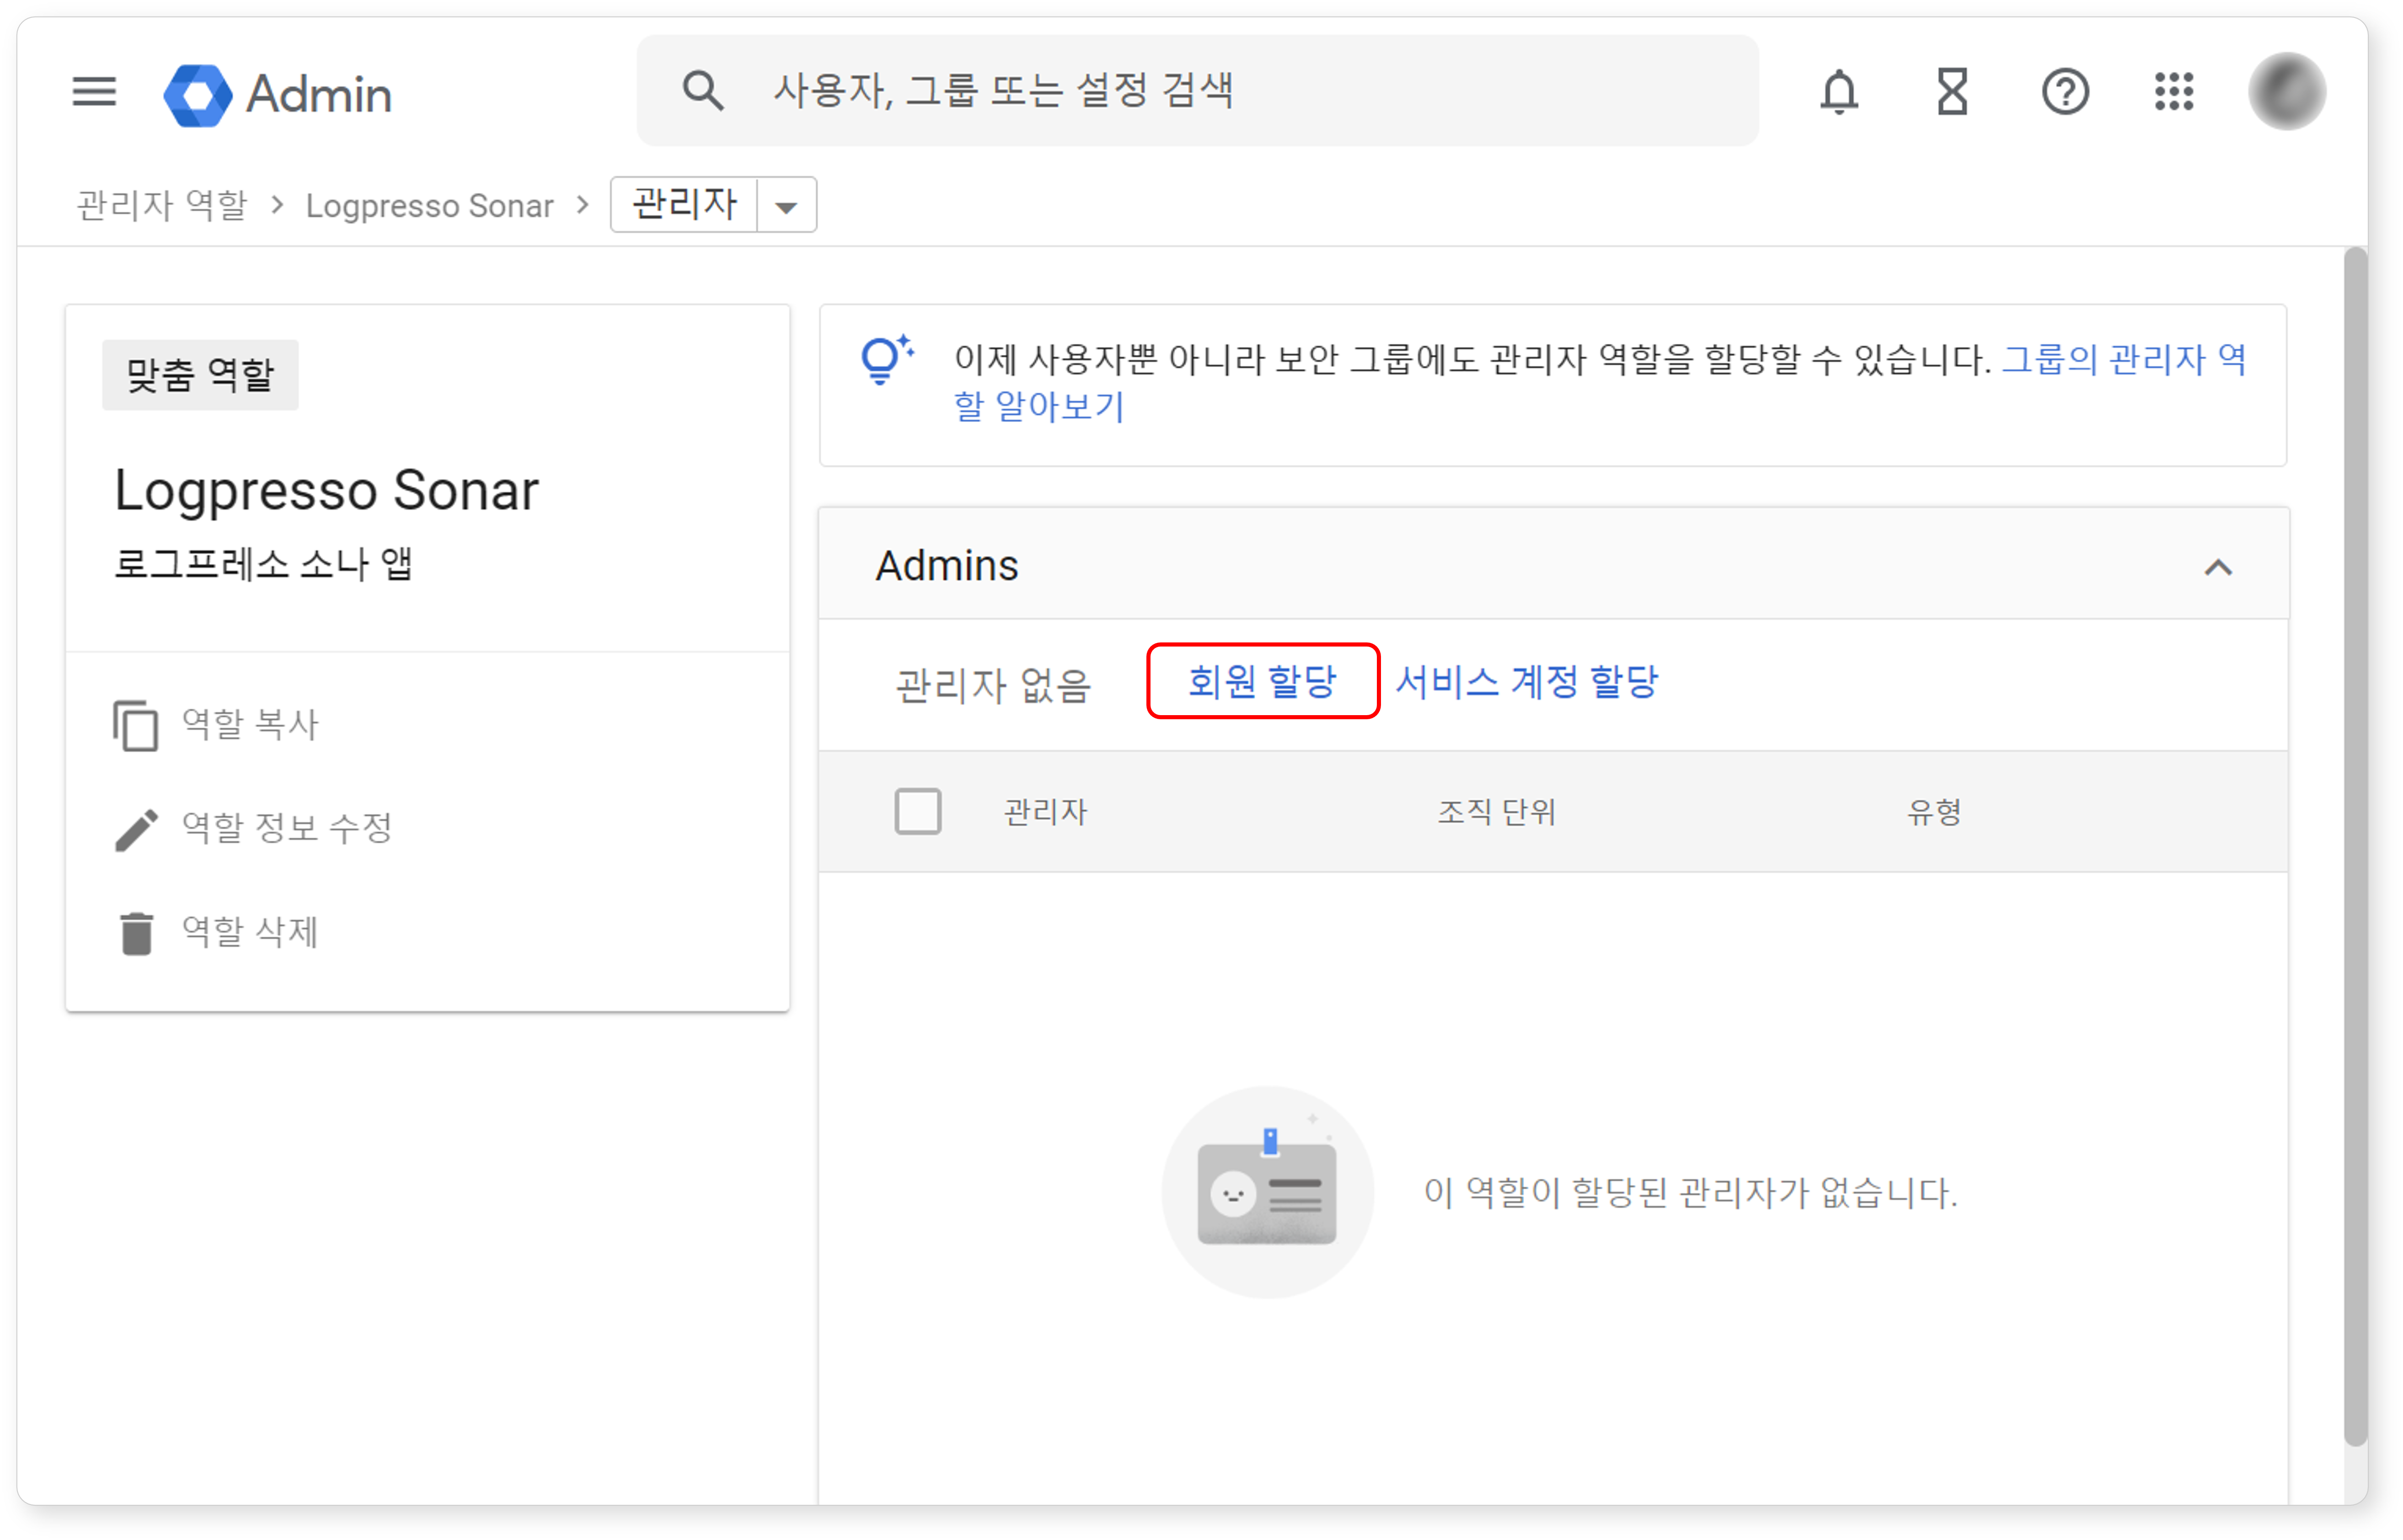
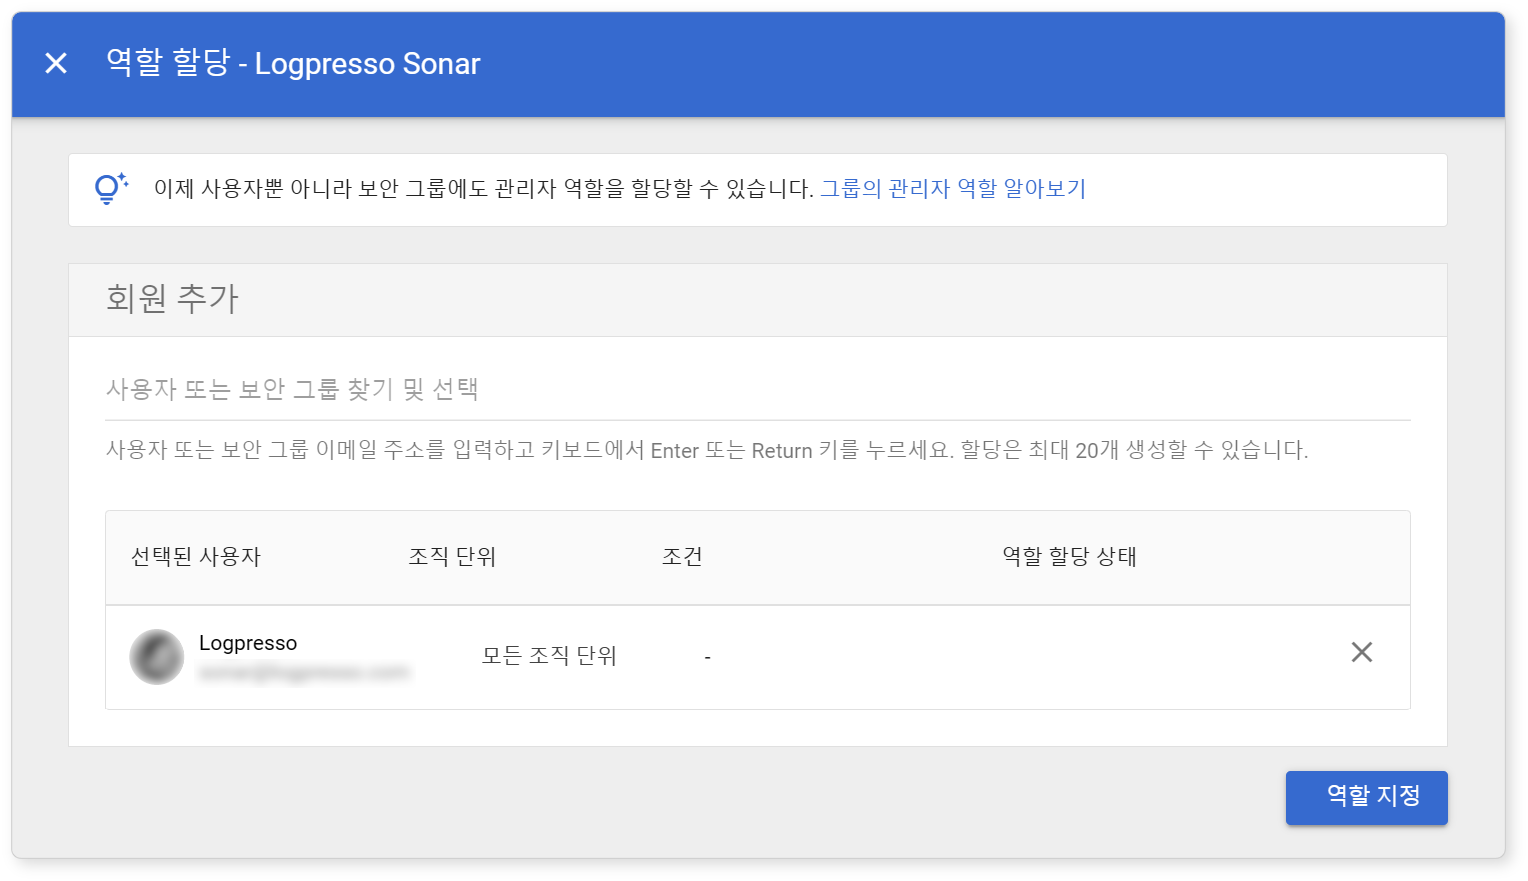
Search for and select the account to grant the role, then click the Assign role button.
Create Logpresso App Project
Create a new project in Google Cloud to integrate with the app and provide the required information.
-
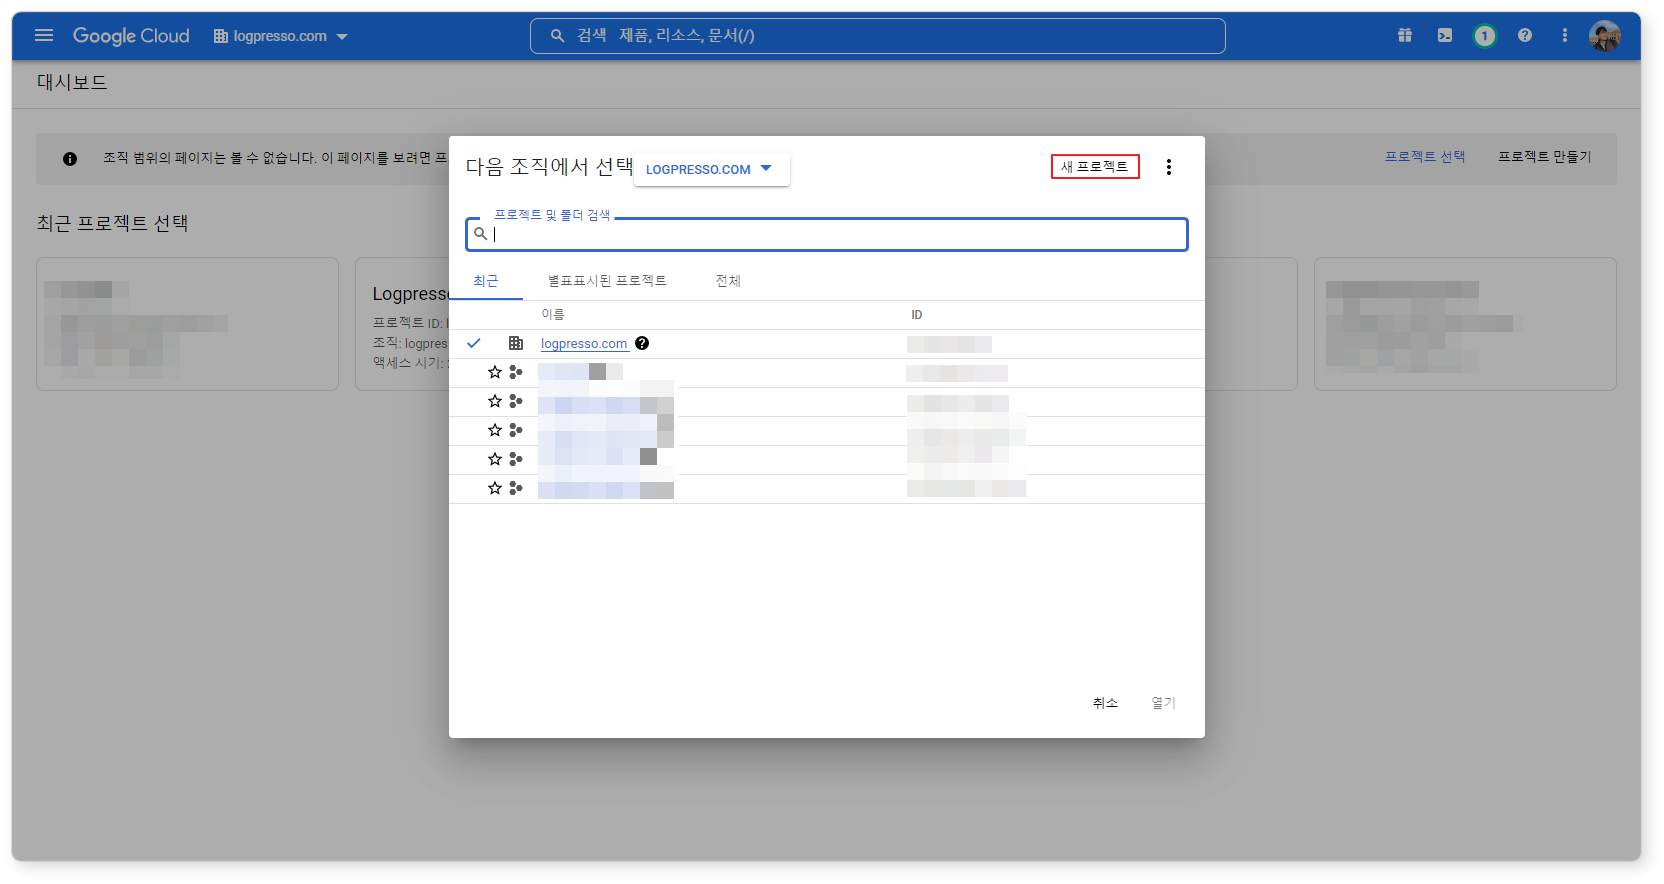
Go to the Google Cloud Console and click the organization name in the top toolbar.
-
In the dialog box, click the New Project button.
-
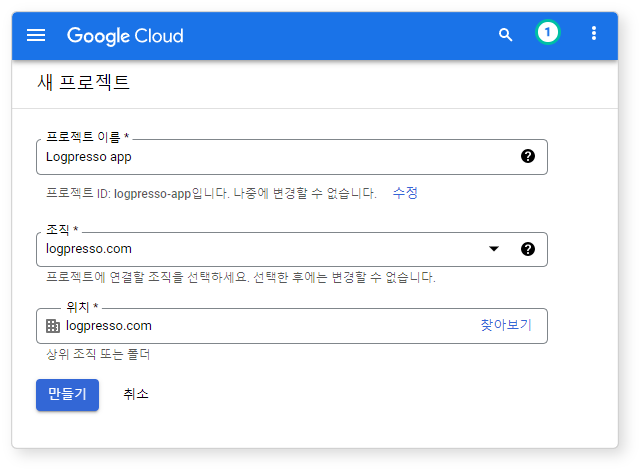
Enter the project name and click the Create button.
Admin SDK
The Google Workspace app integrates with Google Workspace using APIs provided by Google. Configure the Logpresso app to use the Admin SDK.
-
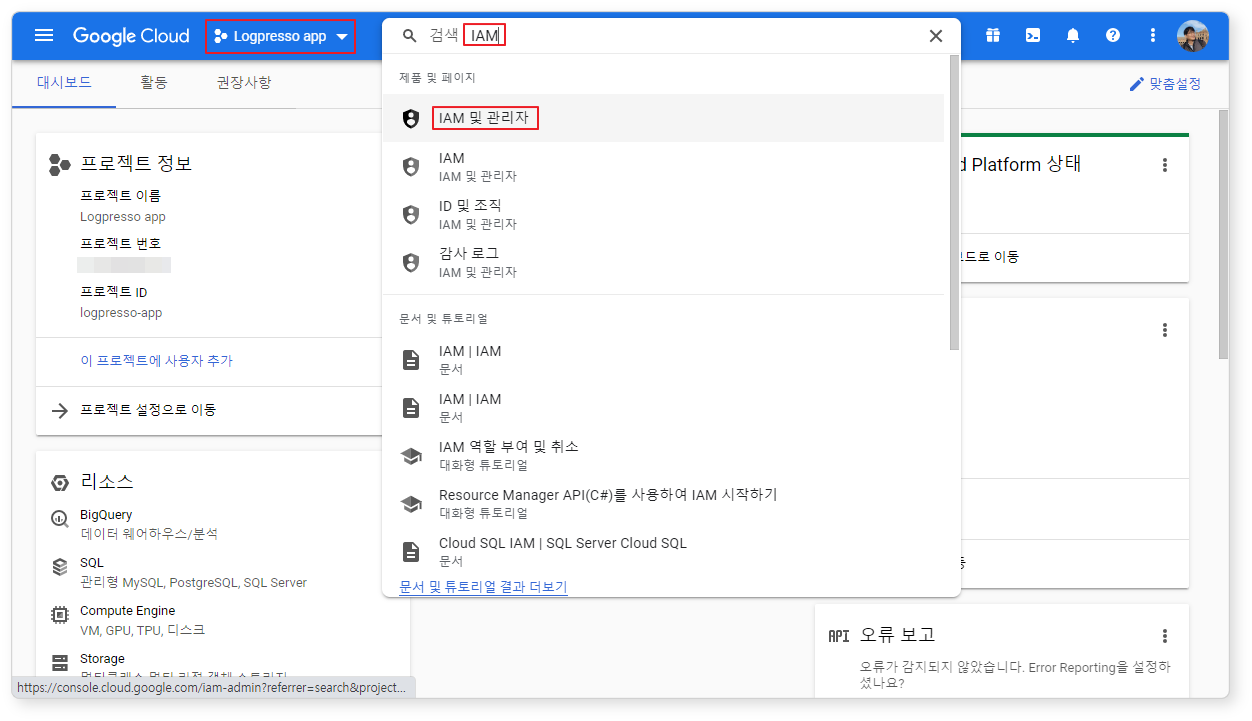
In the top toolbar, switch to the newly created Logpresso app project.
-
In the top search bar, type
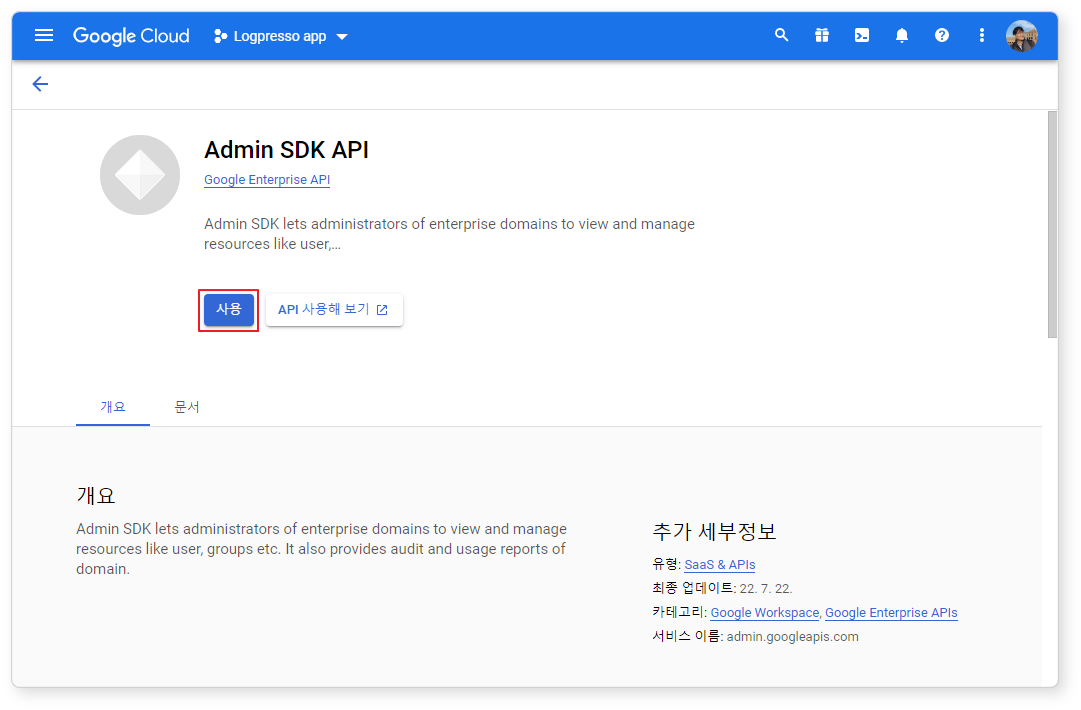
Admin SDK APIand select it. The following screen will appear. Click the Enable button.
Google Workspace Alert Center API
The Google Workspace app integrates with the Google Workspace Alert Center using APIs provided by Google. Configure the Logpresso app to use the Google Workspace Alert Center API.
-
In the top toolbar, switch to the newly created Logpresso app project.
-
In the top search bar, type
Google Workspace Alert Center APIand select it. The following screen will appear. Click the Enable button.
Service Account
Create a service account for the Logpresso app project.
-
Navigate to the IAM admin page.
-
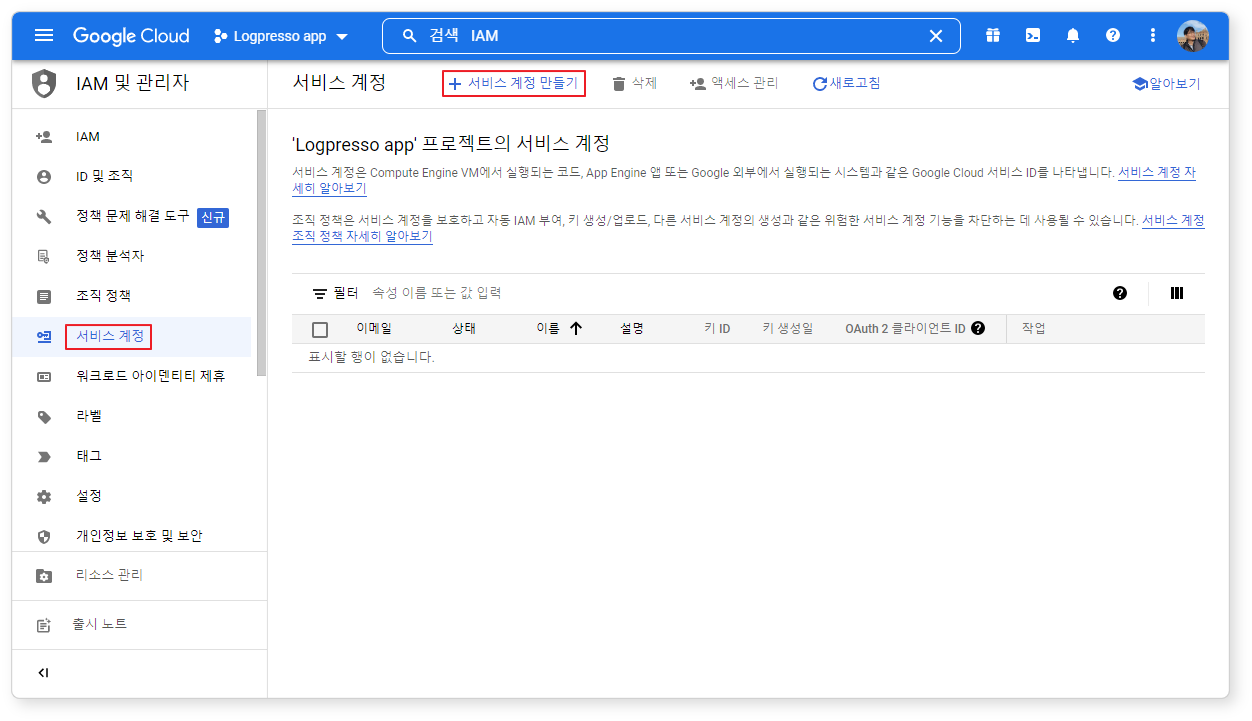
Hover on IAM & Admin > click on Service Accounts. Click on + Create Service Account.
-
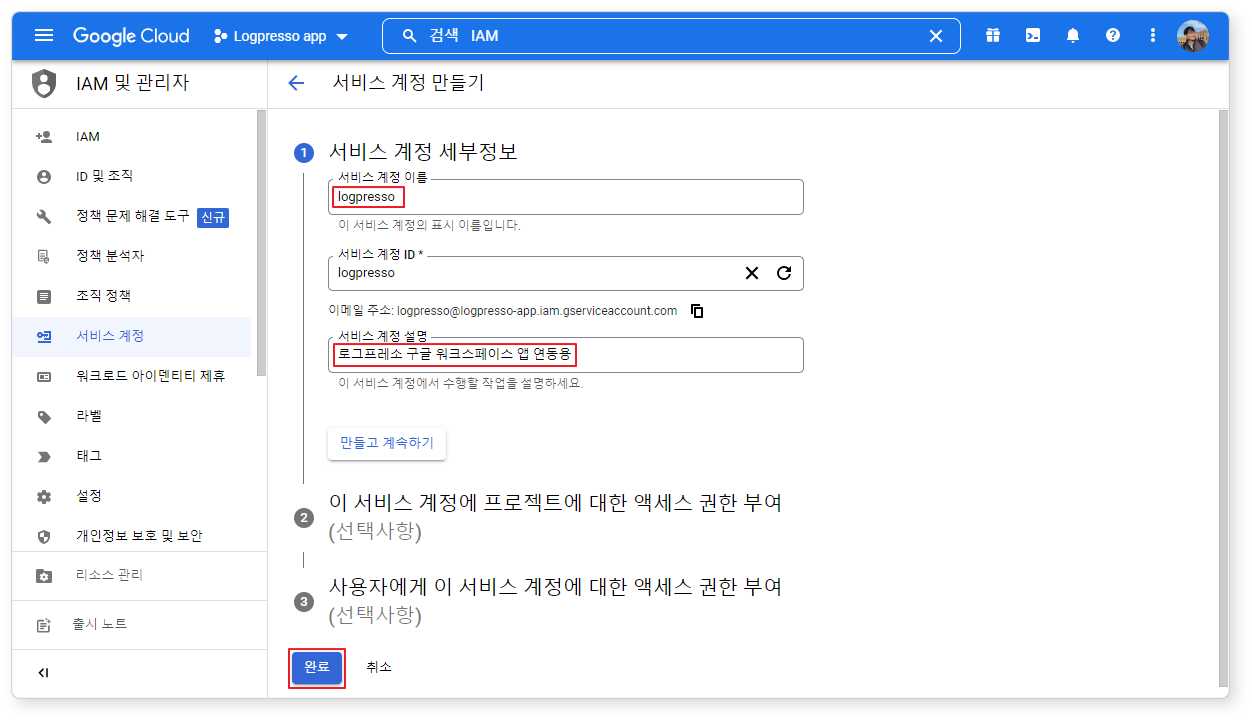
Enter
logpressoas the service account name and click the Done button.
Key
To call and use Google APIs with the service account, you need a key.
-
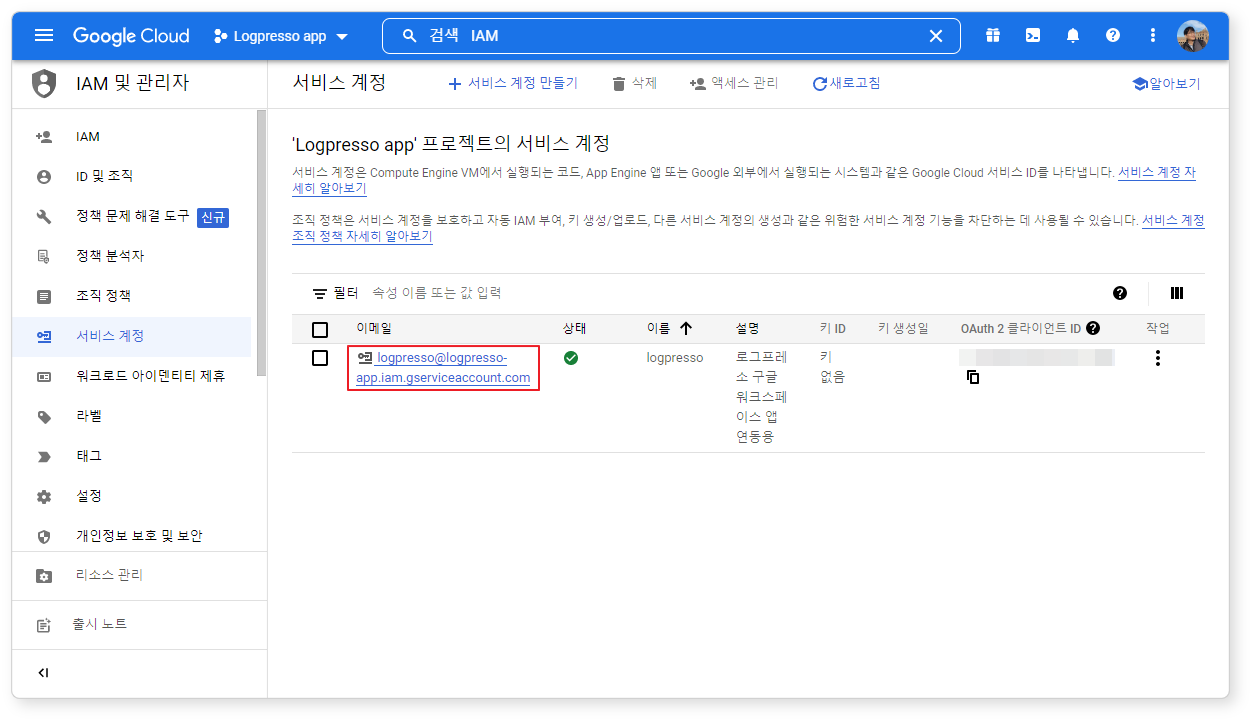
In the service account list, click the email of the newly created logpresso service account to access the details screen.
-
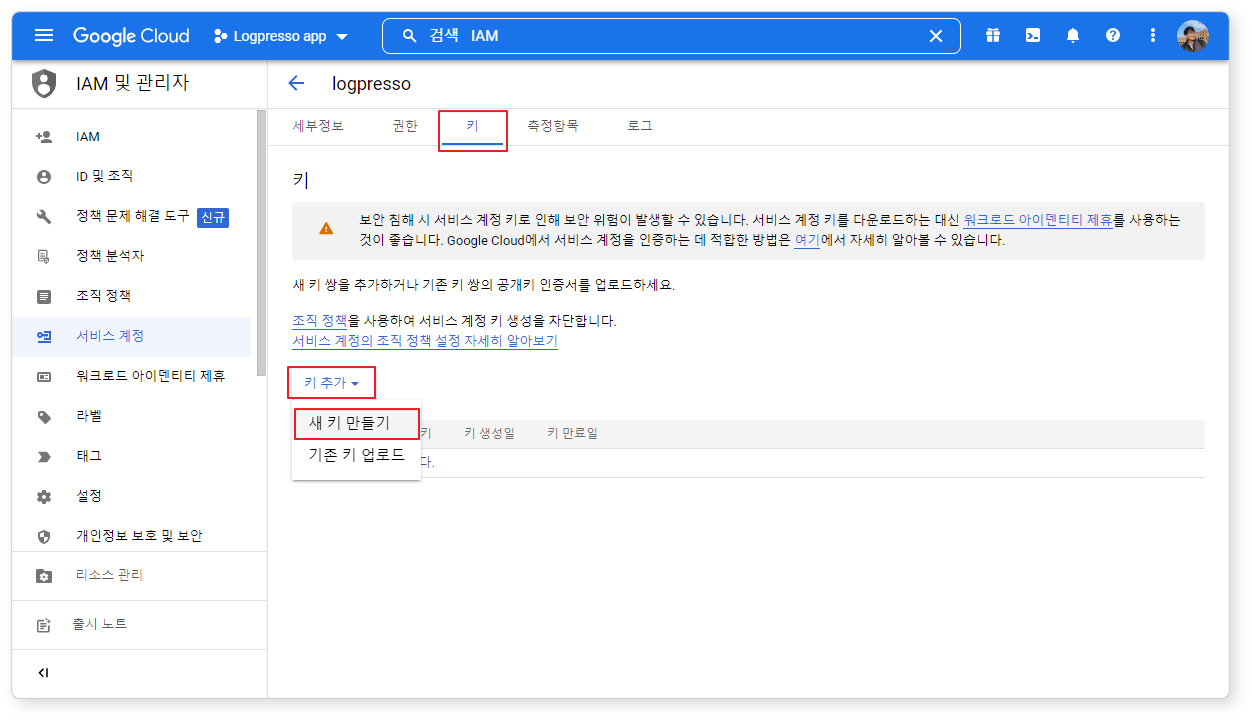
Click Keys, then click Add Key, and from the dropdown menu, select Create New Key.
-
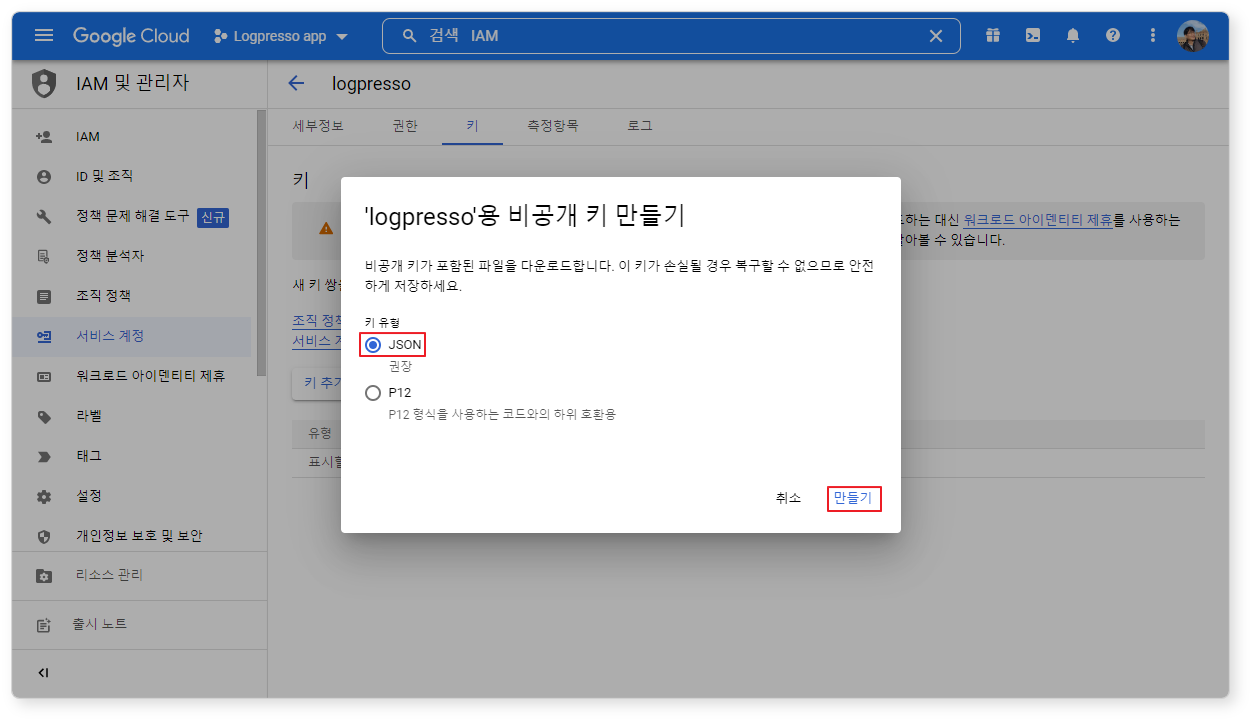
In the Create private key for '…' dialog box, select the key type as JSON and click Create.
-
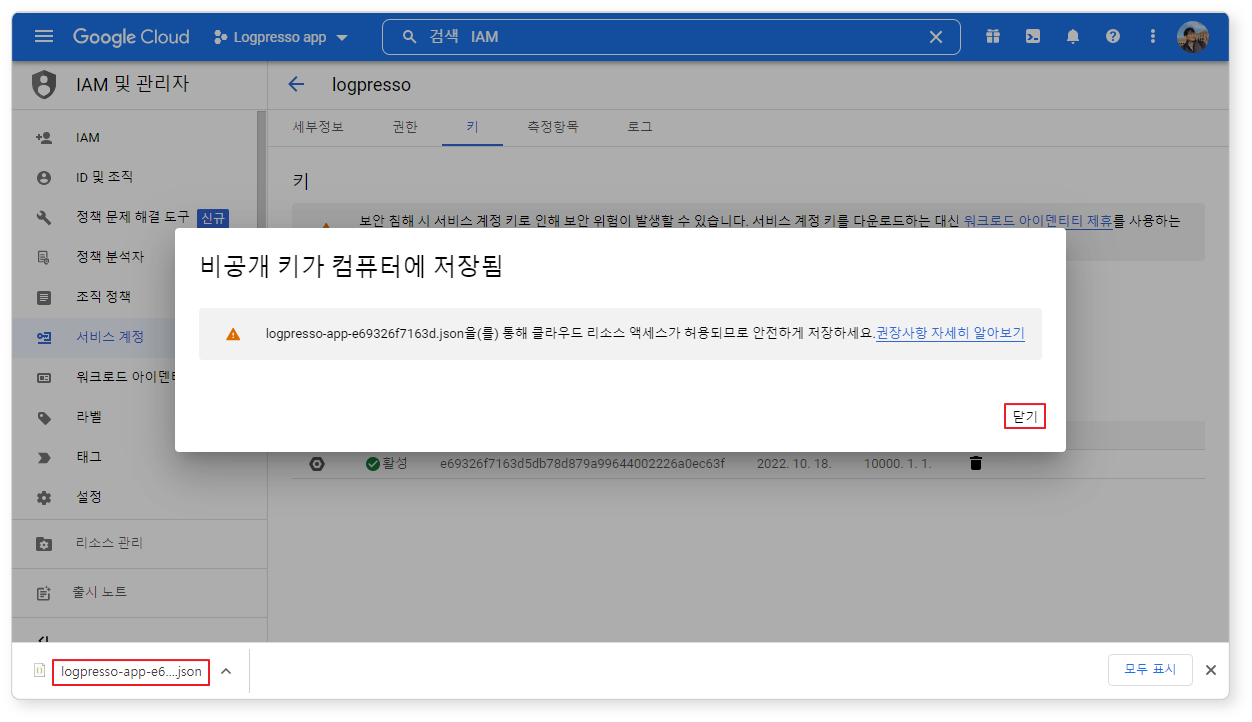
Once the key file is created, it is automatically downloaded. Keep this file safe.
Domain-Wide Delegation
Set up domain-wide delegation to allow the Logpresso app to access the organization's data.
-
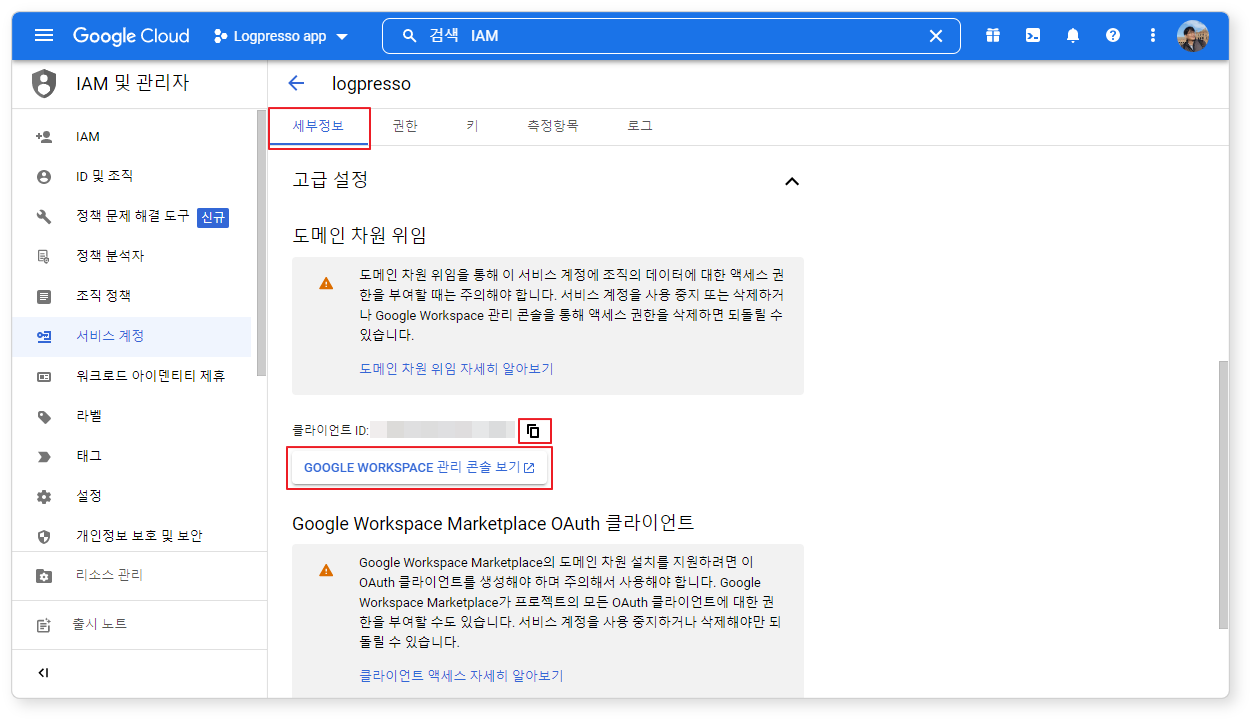
Click Details in the top menu, then expand the Advanced Settings section.
-
Click the copy icon next to Client ID to copy it to your clipboard. This Client ID is required for configuring domain-wide delegation in the admin console.
-
Under the Client ID, click the VIEW GOOGLE WORKSPACE ADMIN CONSOLE button to navigate to the Google Workspace Admin Console.
-
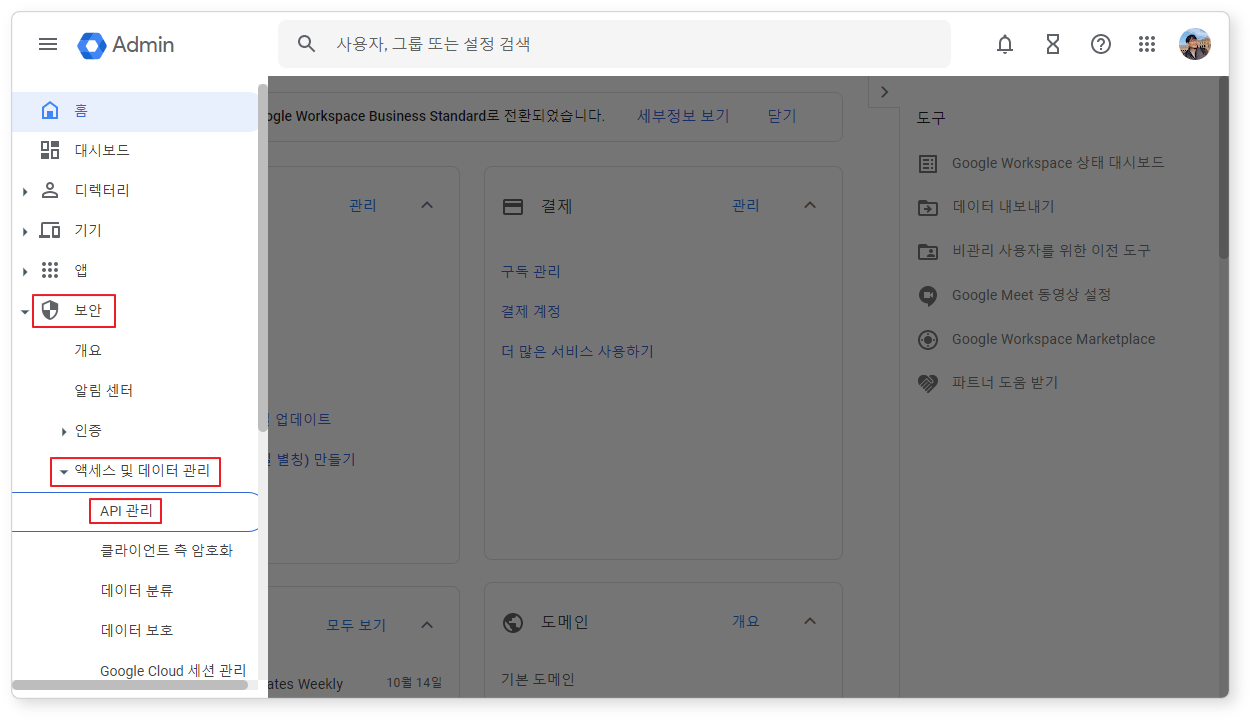
In the Google Workspace Admin Console, go to Security > Access and Data Management > API Controls.
-
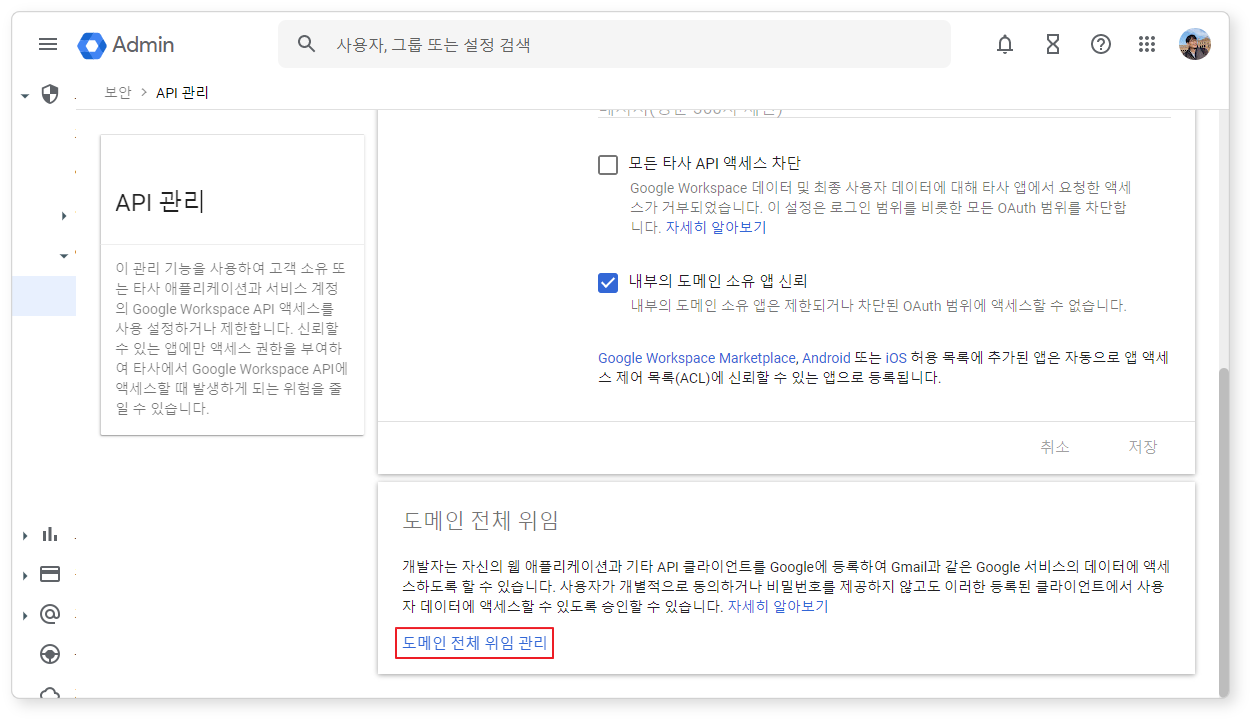
Scroll down and click MANAGE DOMAIN WIDE DELEGATION at the bottom of the screen.
-
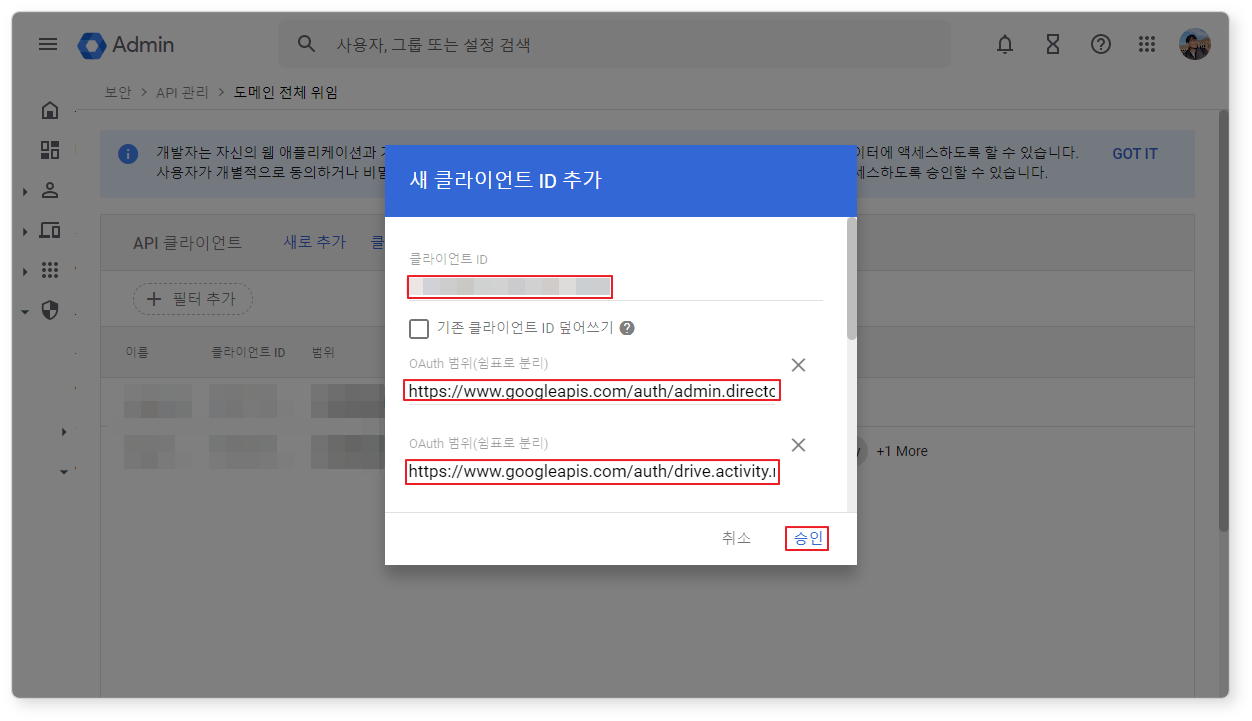
In the Domain-Wide Delegation screen, click the Add New button in the top menu. In the Add New Client ID dialog box, enter the following:
-
Paste the Client ID you copied earlier into the Client ID field.
-
Copy and paste the following string into the OAuth Scopes field.
https://www.googleapis.com/auth/admin.directory.user,https://www.googleapis.com/auth/admin.directory.user.readonly,https://www.googleapis.com/auth/admin.directory.group.readonly,https://www.googleapis.com/auth/admin.directory.domain.readonly,https://www.googleapis.com/auth/admin.reports.audit.readonly,https://www.googleapis.com/auth/drive.activity.readonly,https://www.googleapis.com/auth/contacts.readonly,https://www.googleapis.com/auth/spreadsheets,https://www.googleapis.com/auth/apps.alertsThe string above consists of the following OAuth scope URLs:
- https://www.googleapis.com/auth/admin.directory.user
- https://www.googleapis.com/auth/admin.directory.user.readonly
- https://www.googleapis.com/auth/admin.directory.group.readonly
- https://www.googleapis.com/auth/admin.directory.domain.readonly
- https://www.googleapis.com/auth/admin.reports.audit.readonly
- https://www.googleapis.com/auth/drive.activity.readonly
- https://www.googleapis.com/auth/contacts.readonly
- https://www.googleapis.com/auth/spreadsheets (available from version 1.1.2309.0)
- https://www.googleapis.com/auth/apps.alerts (available from version1.4.2411.0)
-
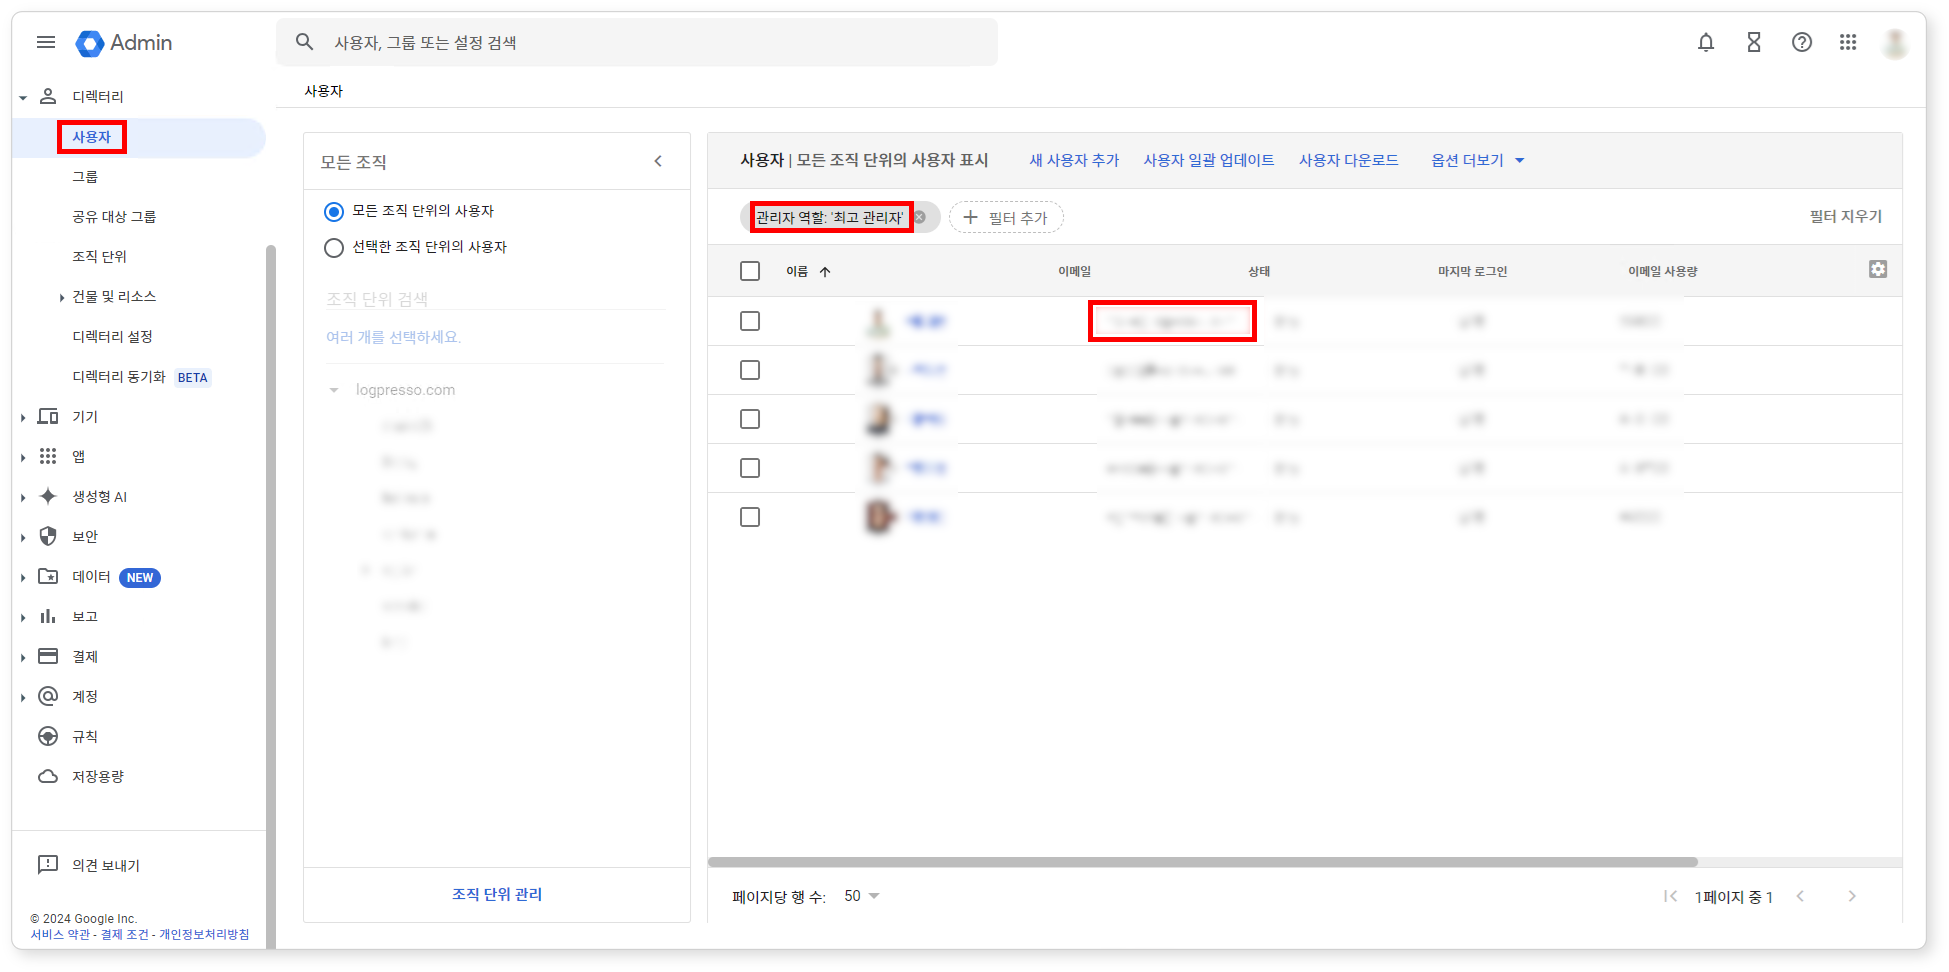
When configuring the connection profile, the delegated account information added is as shown in the image below. (Only the admin account can be linked.)
That's all the setup you need to do in Google Workspace.
App Installation
First, refer to the App Installation Guide to install the Google Workspace app. After the app installation, proceed with the following settings:
- Connect Profile Settings
- Logger Settings
- Google Workspace Admin Activity
- Google Workspace Login
- Google Meet Activity
- Google Drive Activity
- Google Workspace Alert Center
Connect Profile Settings
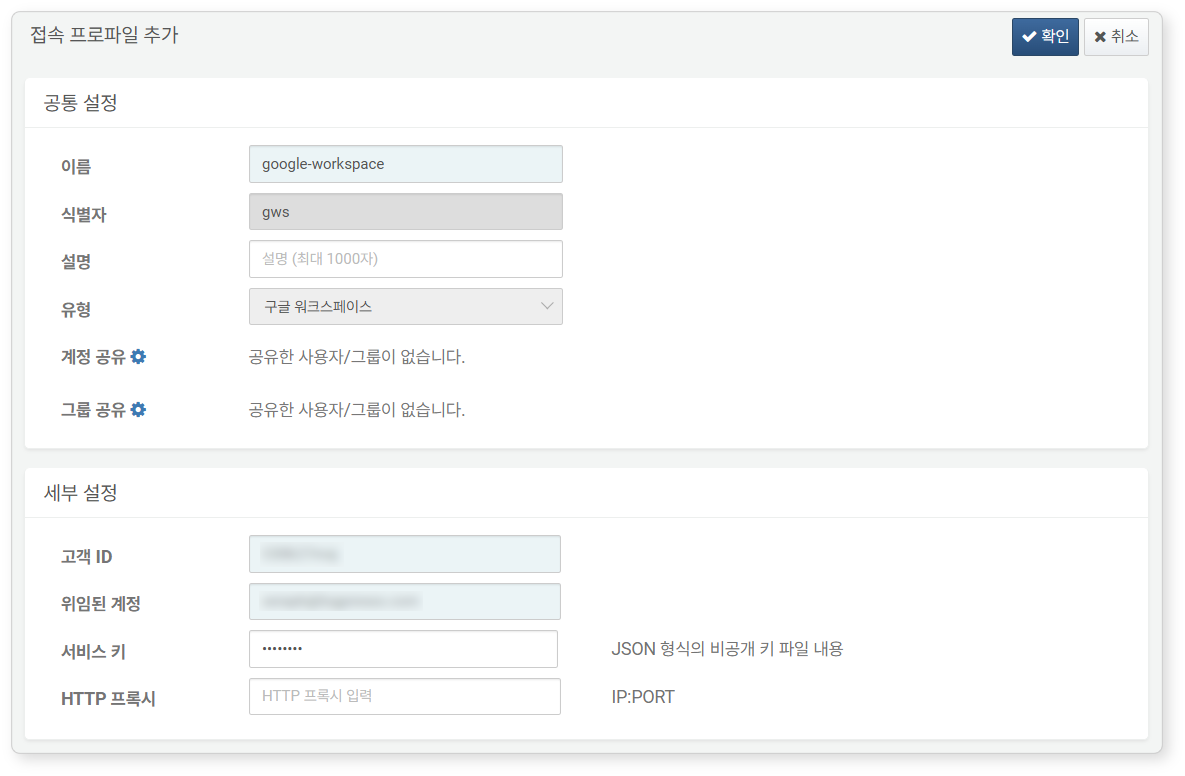
Refer to the Connect Profile to add a connect profile.
The following are the required fields for connect profile settings:
- Name: A unique name to identify the connection profile
- Identifier: The unique identifier for the connect profile used in Logpresso queries, etc.
- Type: Select Google Workspace
- Customer ID: The customer ID found in the Google Workspace Admin Console
- Delegated Account: The email of the user account assigned the administrator role for Logpresso Sonar
- Service Key: The contents of the JSON-format key file
Logger Settings
The Google Workspace app requires five different loggers. Refer to the Logger Guide to add a logger.
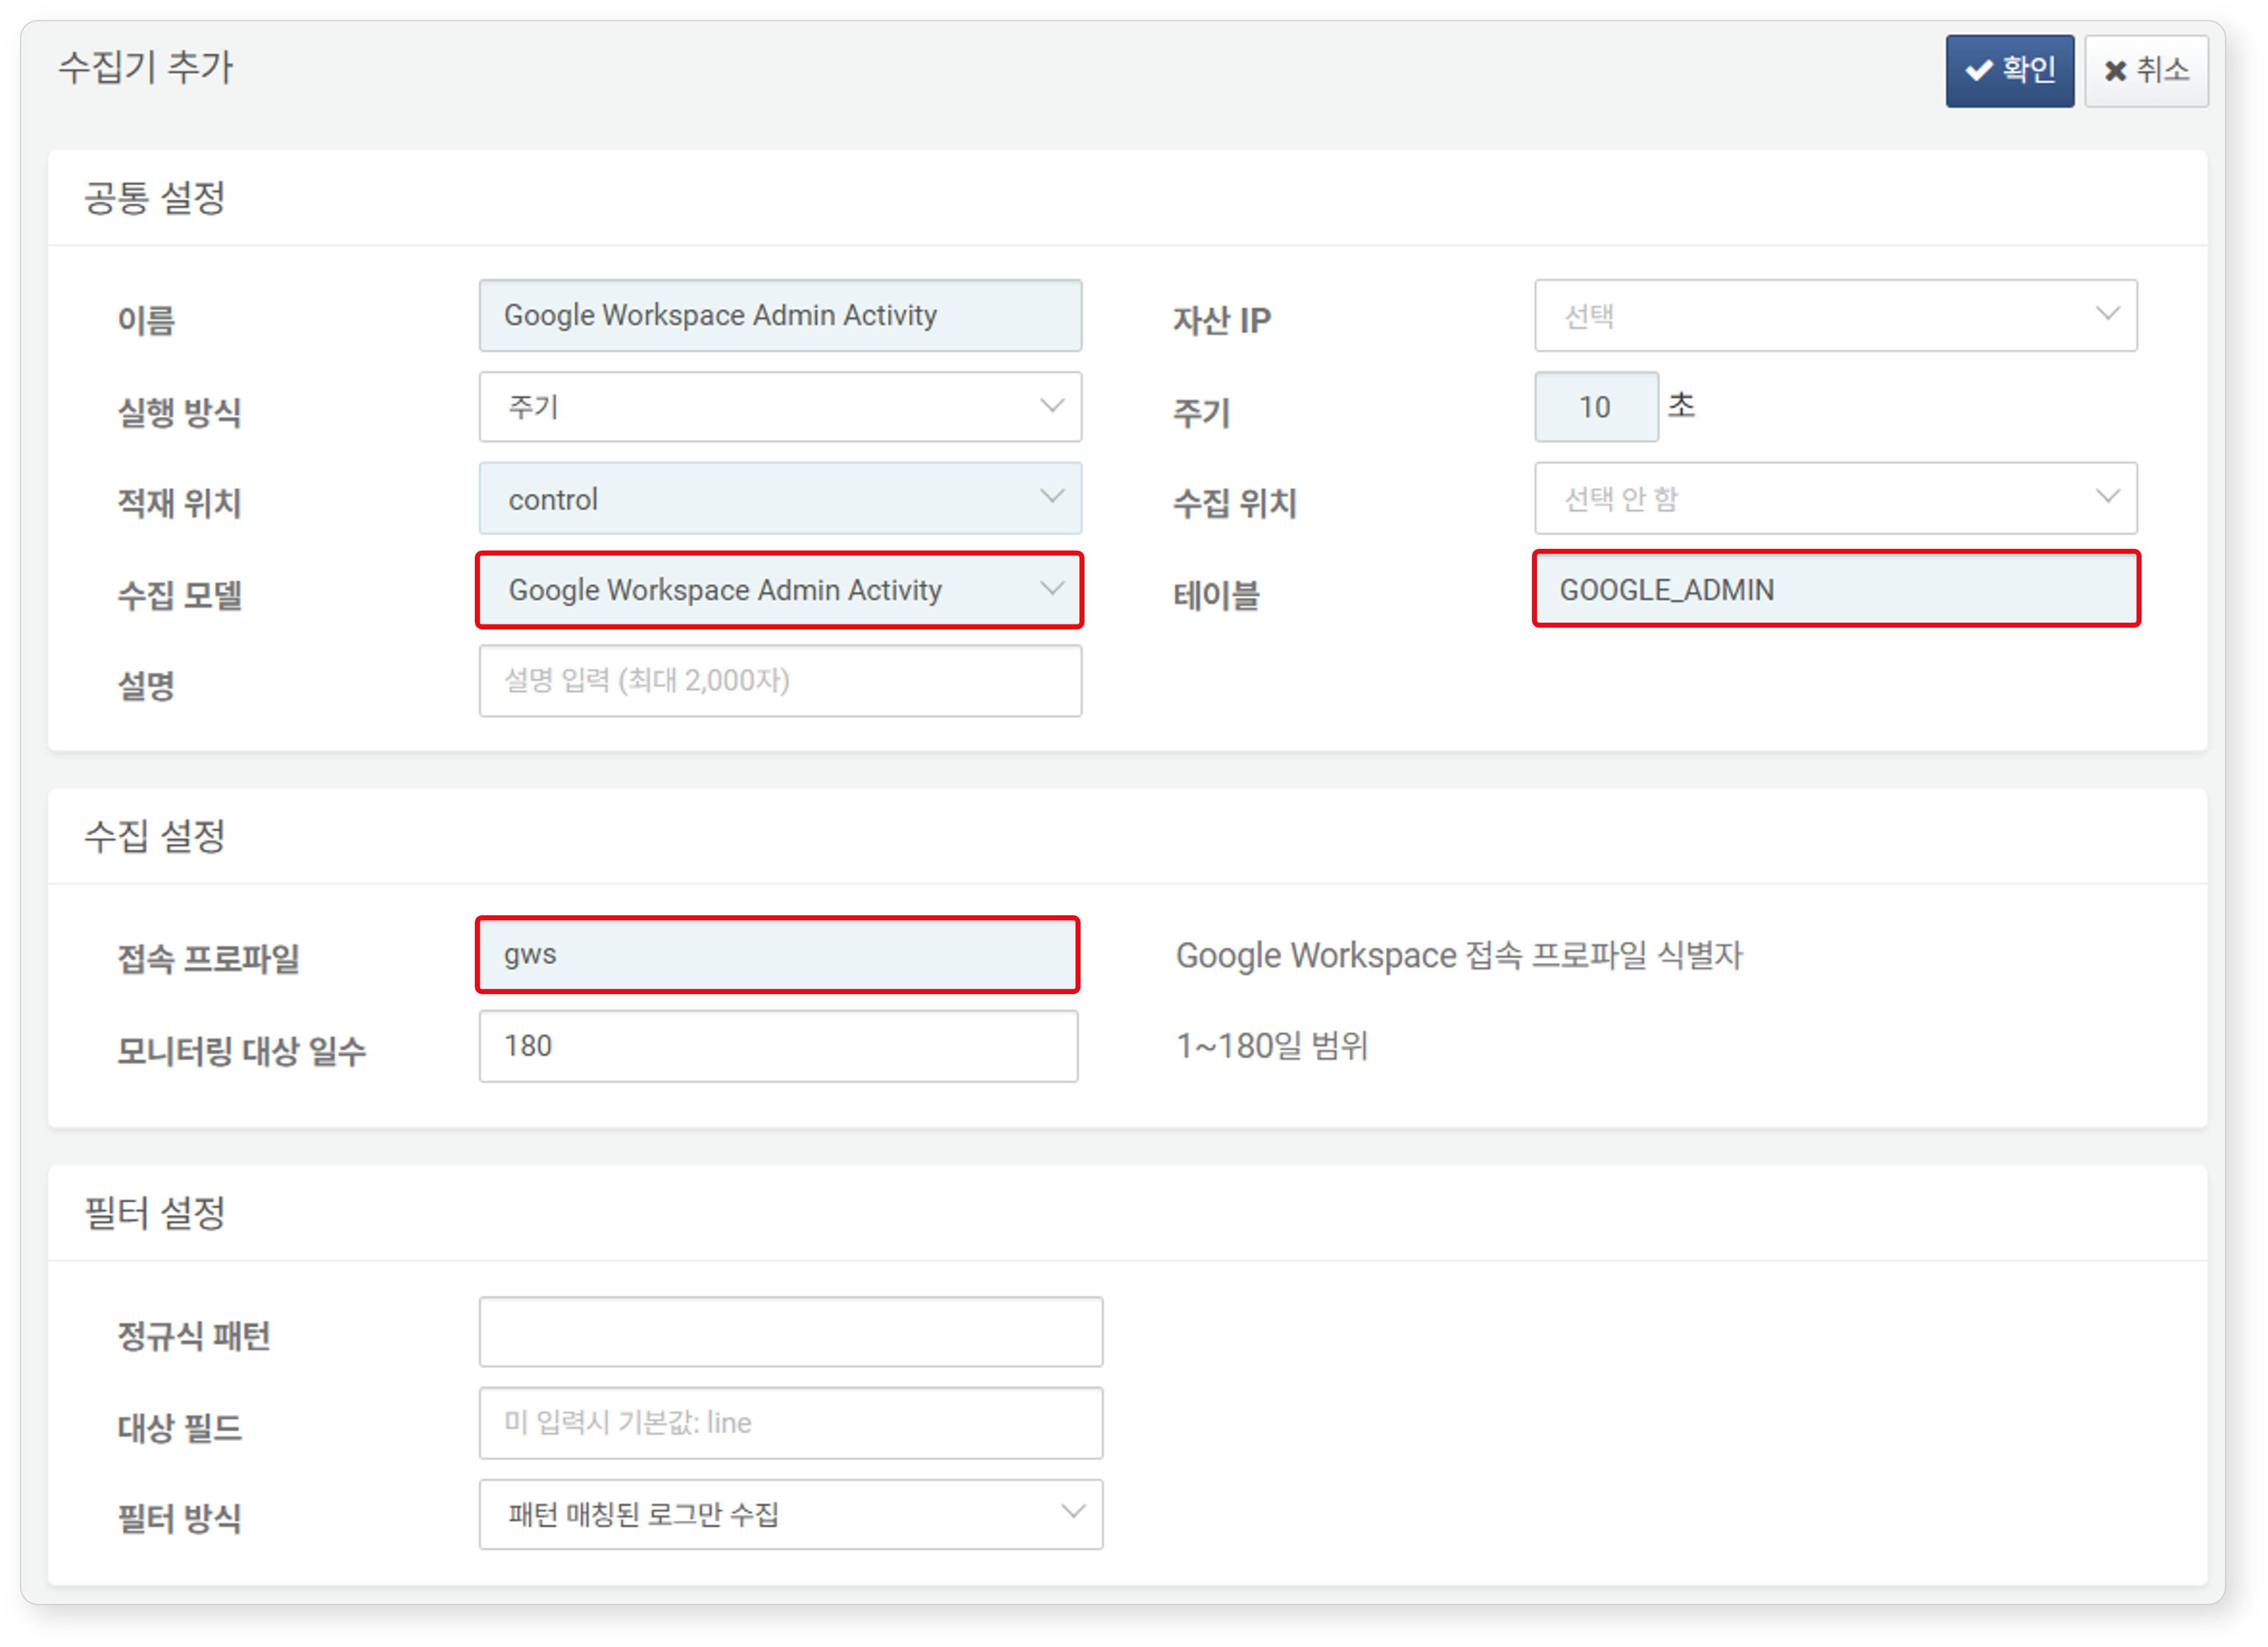
Google Workspace Admin Activity
The following are the required fields for the logger settings:
- Name: A unique name to identify the logger
- Interval: 10 seconds (the default is 5 seconds, but 10 seconds or more is recommended)
- Storage: Select an appropriate node based on your Logpresso configuration.
- Logger Model:
Google Workspace Admin Activity - Table: Enter a name starting with
GOOGLE_ADMIN. - Connect Profile: the identifier of the connect profile
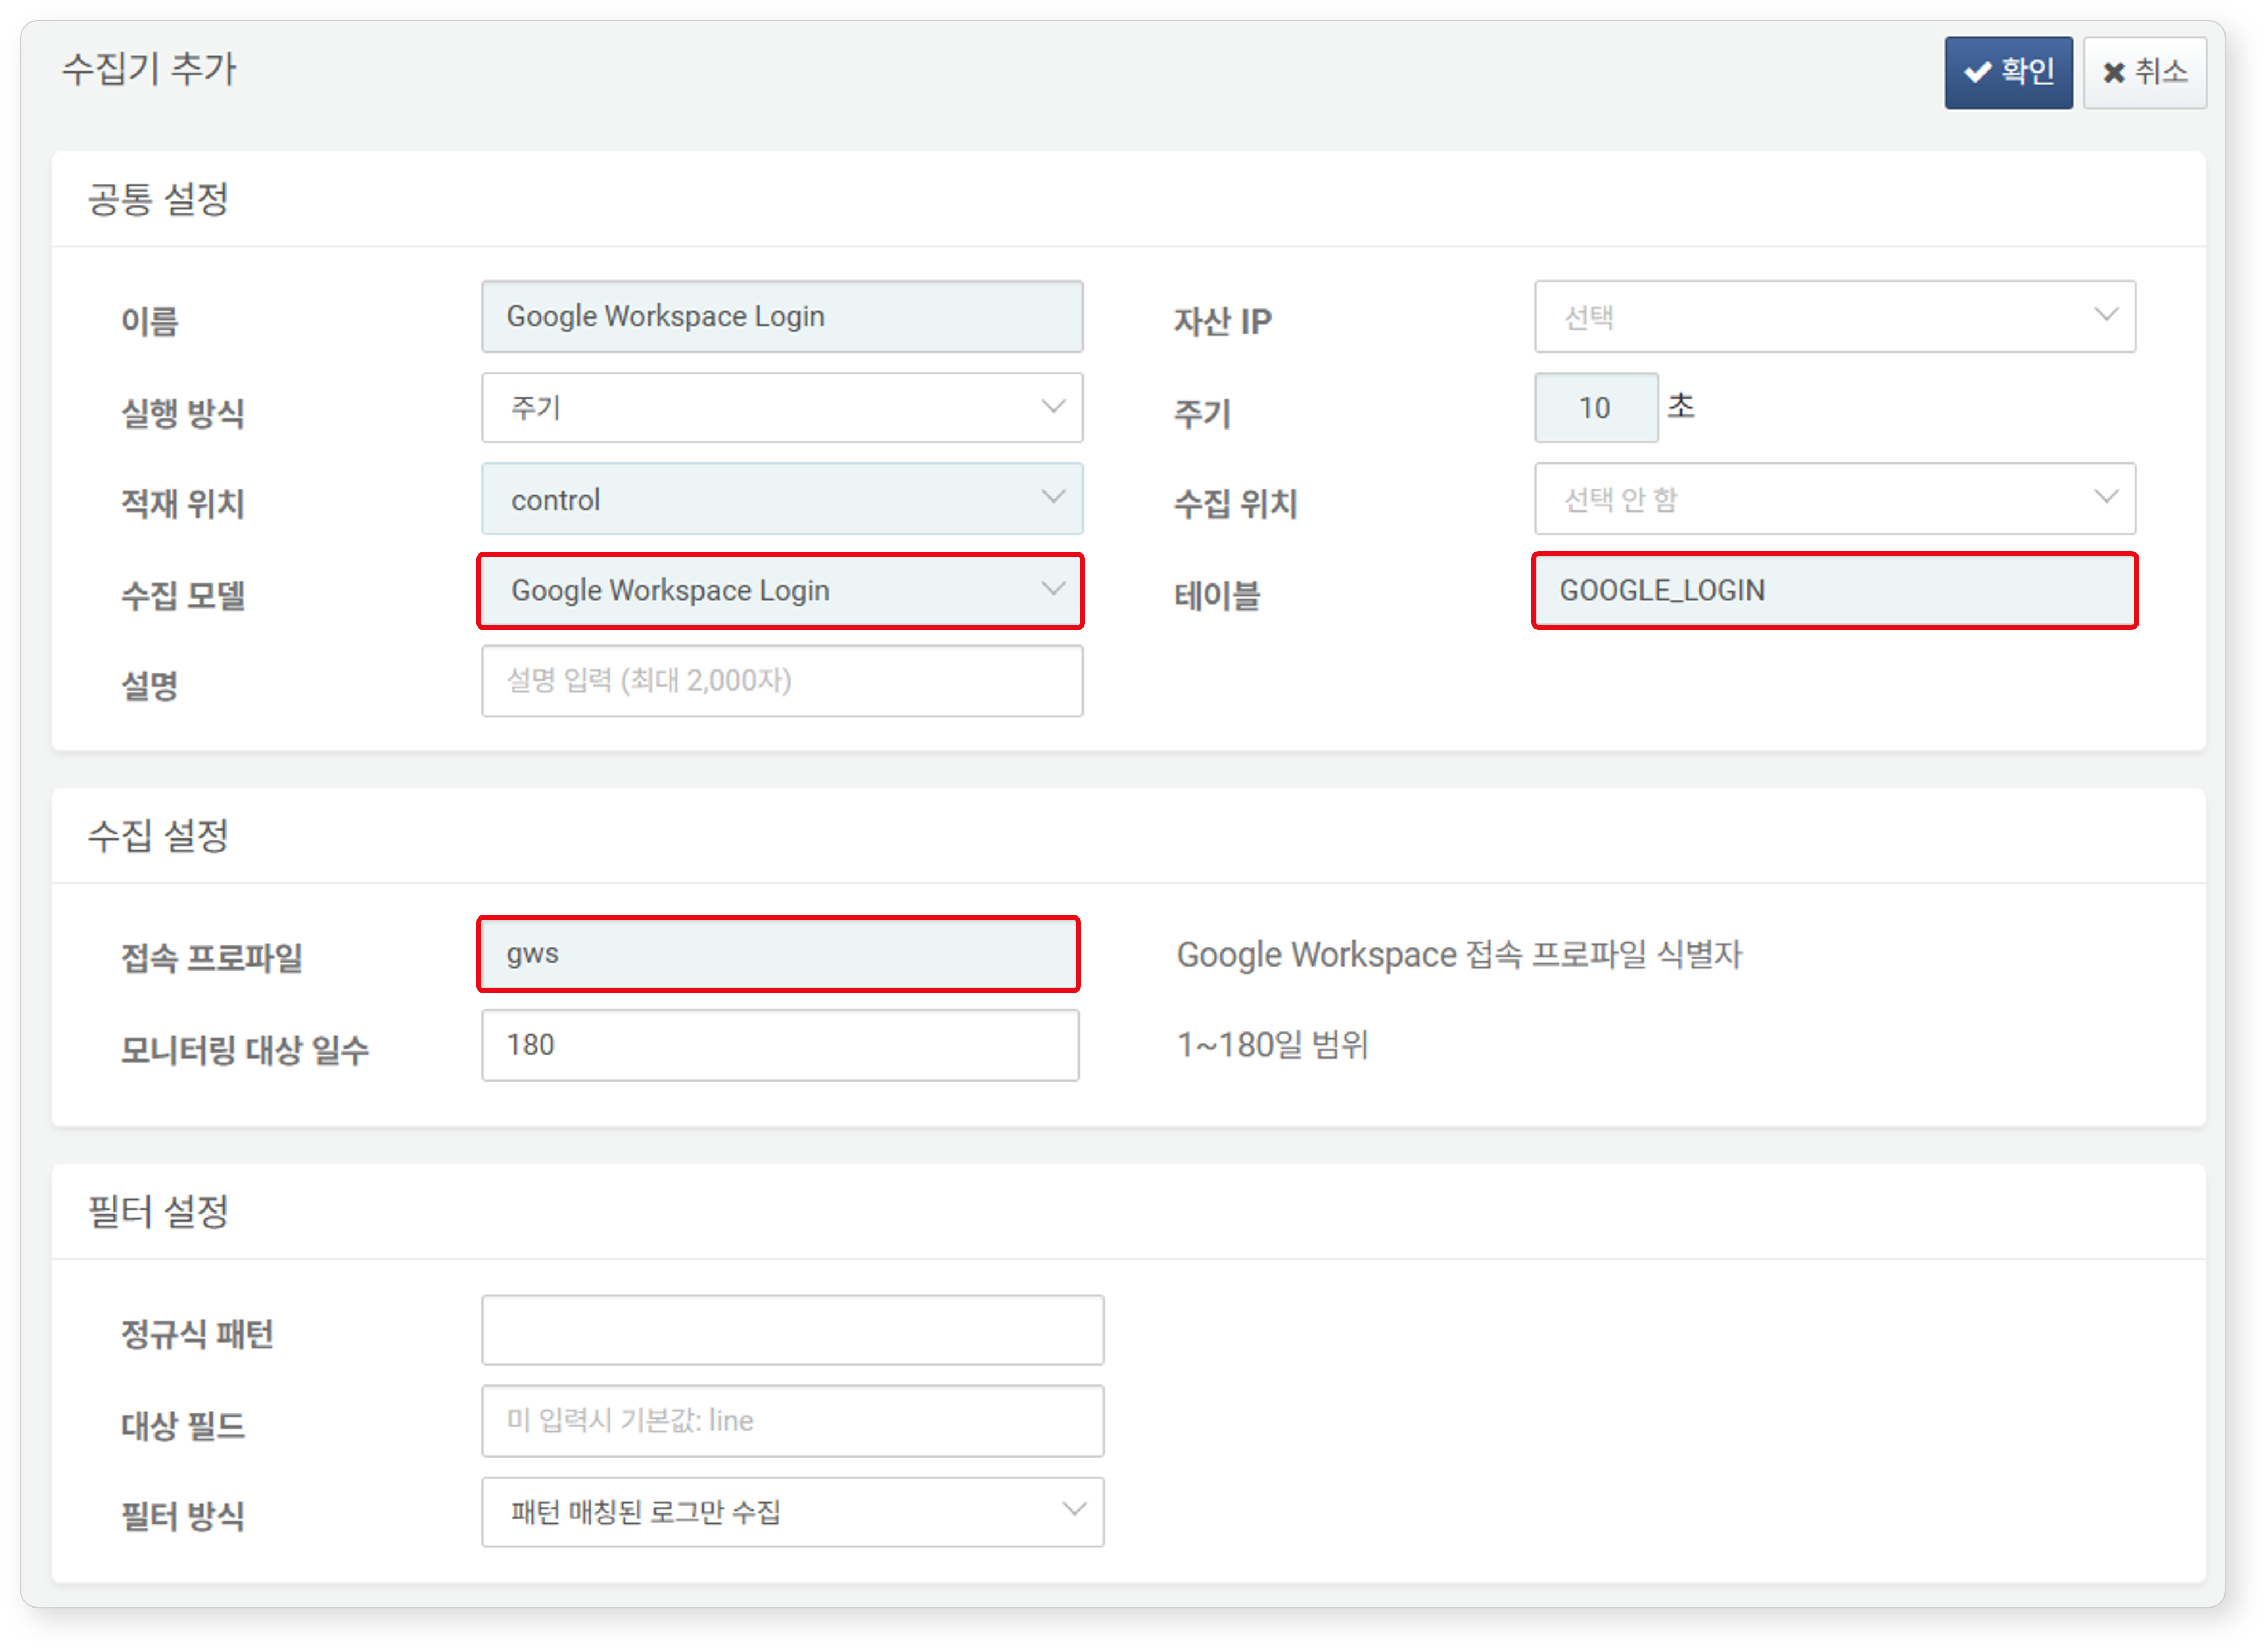
Google Workspace Login
The following are the required fields for the logger settings:
- Name: A unique name to identify the logger
- Interval: 10 seconds (the default is 5 seconds, but 10 seconds or more is recommended)
- Storage: Select an appropriate node based on your Logpresso configuration.
- Logger Model:
Google Workspace Login - Table: Enter a name starting with
GOOGLE_LOGIN. - Connect Profile: the identifier of the connect profile
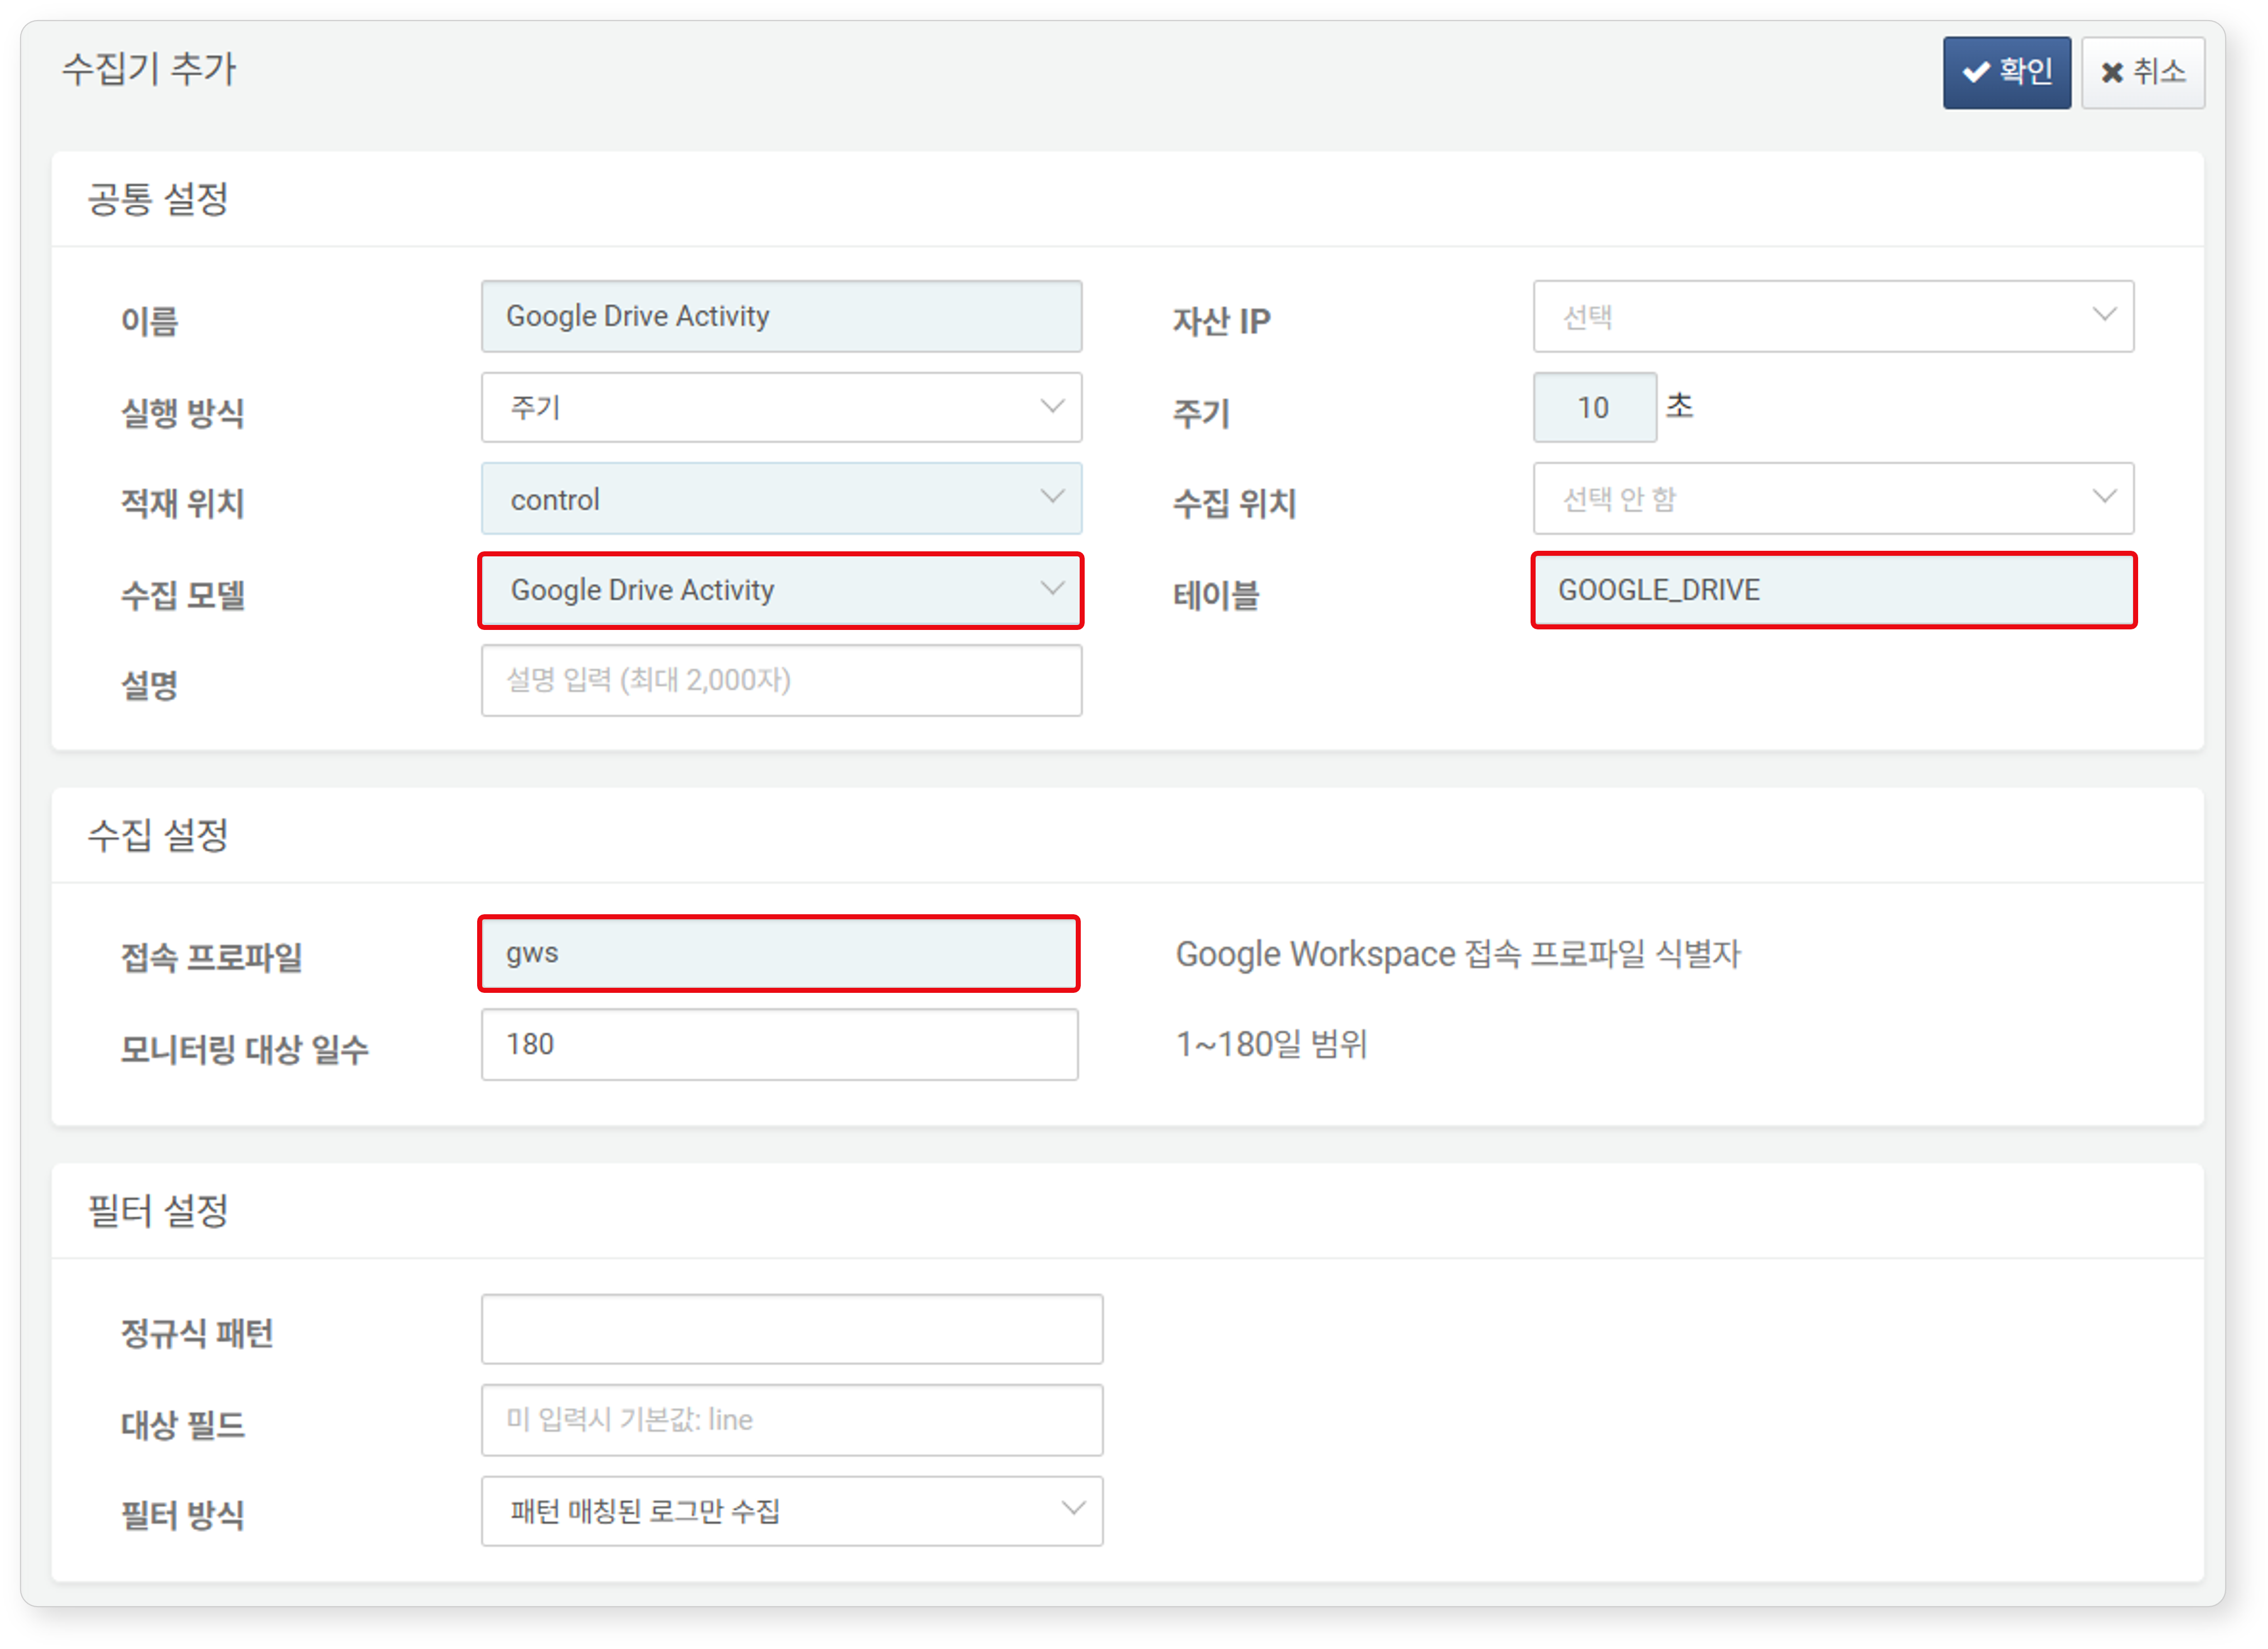
Google Drive Activity
The following are the required fields for the logger settings:
- Name: A unique name to identify the logger
- Interval: 10 seconds (the default is 5 seconds, but 10 seconds or more is recommended)
- Storage: Select an appropriate node based on your Logpresso configuration.
- Logger Model:
Google Drive Activity - Table: Enter a name starting with
GOOGLE_DRIVE. - Connect Profile: the identifier of the connect profile
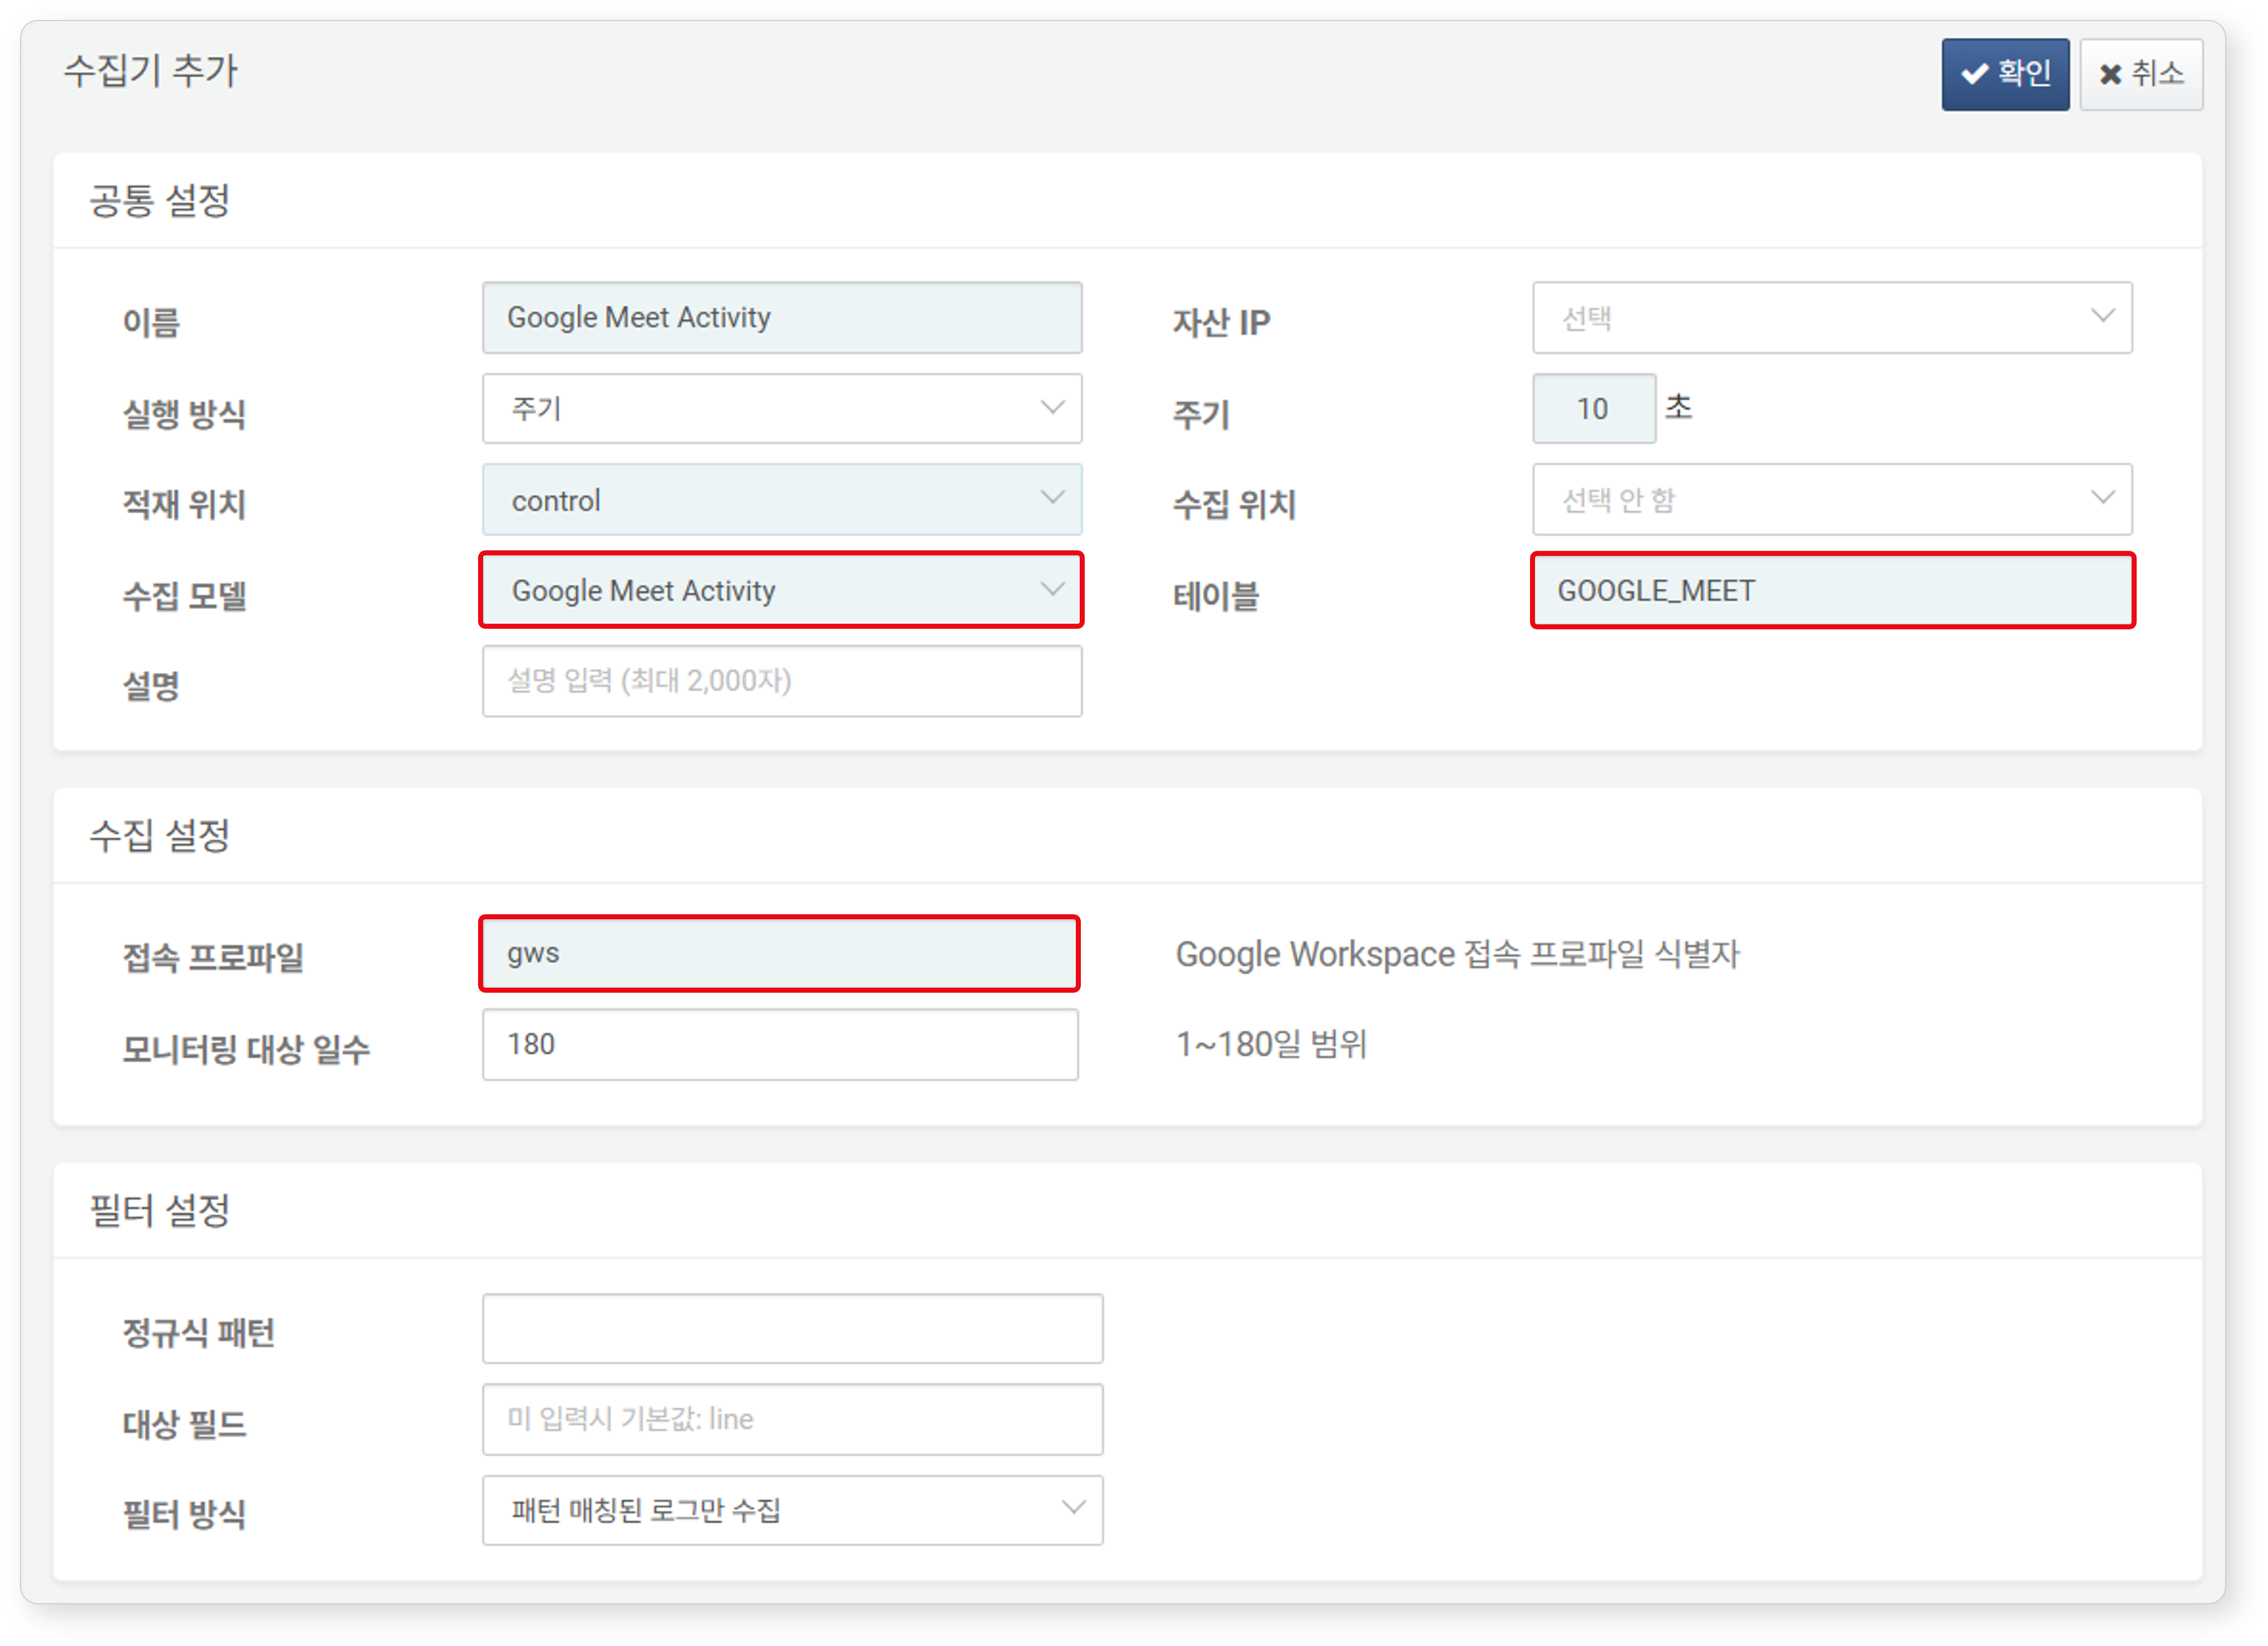
Google Meet Activity
The following are the required fields for the logger settings:
- Name: A unique name to identify the logger
- Interval: 10 seconds (the default is 5 seconds, but 10 seconds or more is recommended)
- Storage: Select an appropriate node based on your Logpresso configuration.
- Logger Model:
Google Meet Activity - Table: Enter a name starting with
GOOGLE_MEET. - Connect Profile: the identifier of the connect profile
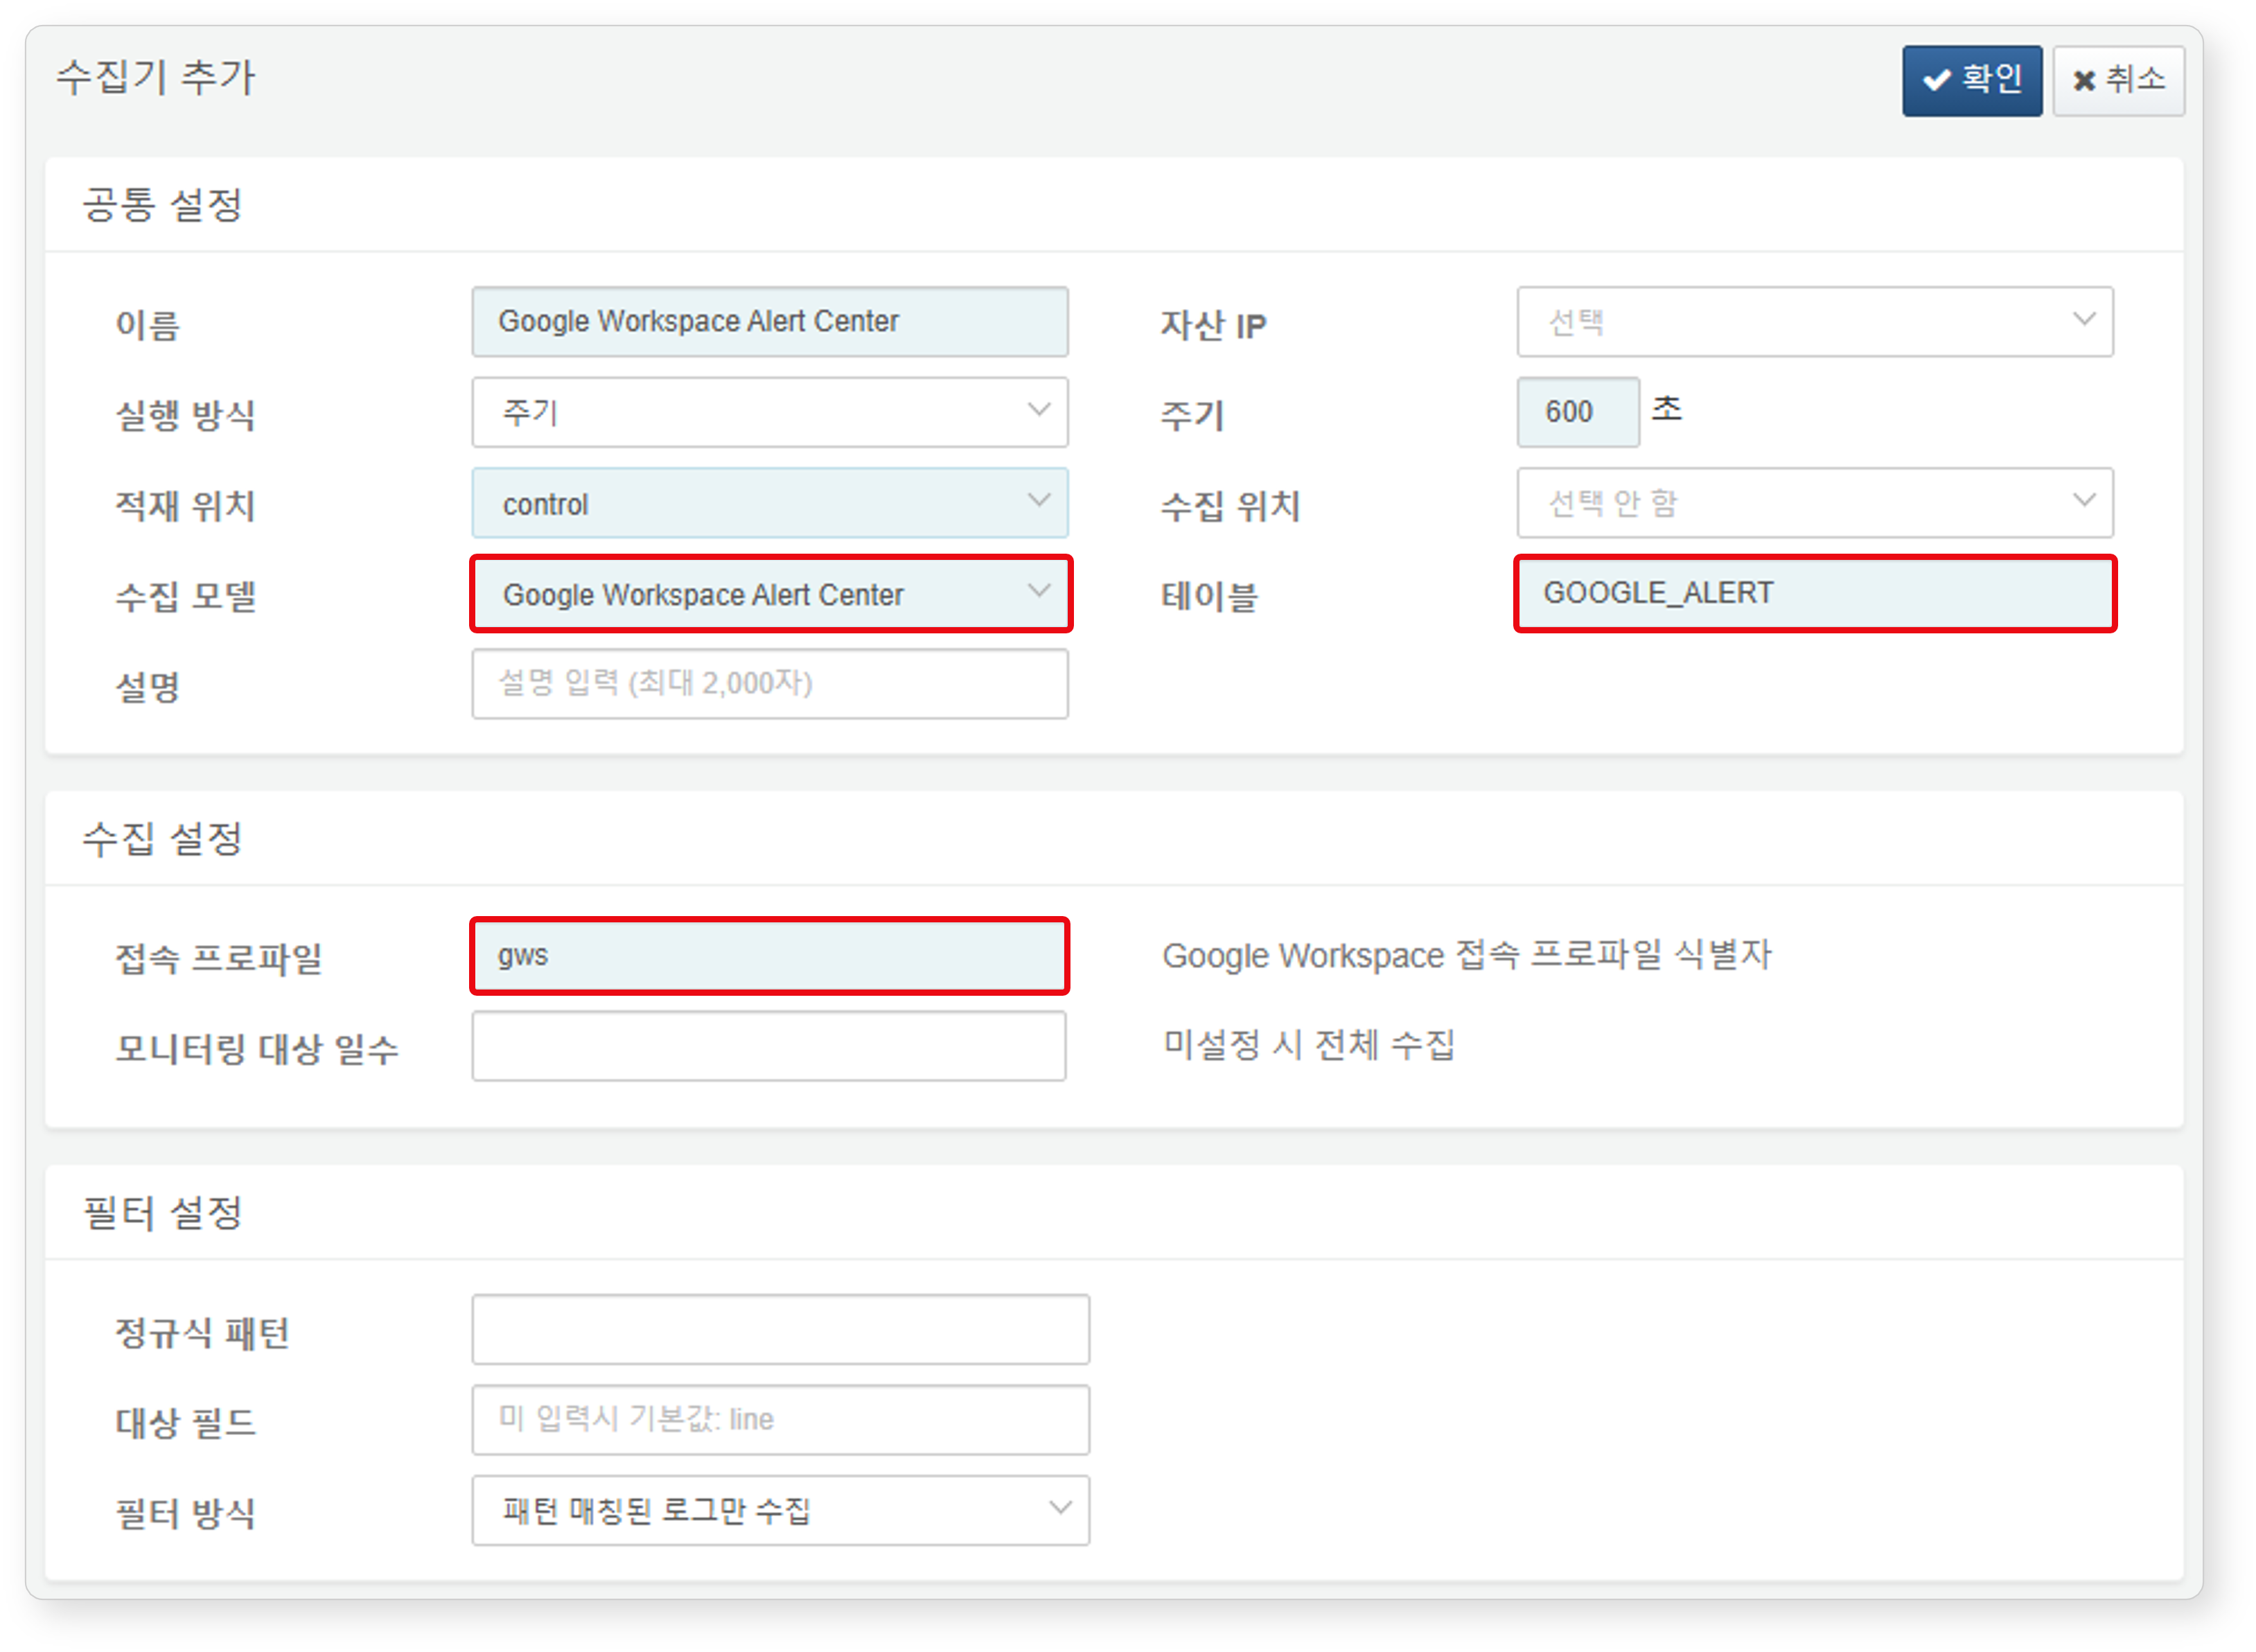
Google Workspace Alert Center
The following are the required fields for the logger settings:
- Name: A unique name to identify the logger
- Interval: 10 seconds (the default is 5 seconds, but 10 seconds or more is recommended)
- Storage: Select an appropriate node based on your Logpresso configuration.
- Logger Model:
Google Workspace Alert Center - Table: Enter a name starting with
GOOGLE_ALERT. - Connect Profile: the identifier of the connect profile
All settings have been completed.

