Install Guide
Overview
Azure is Microsoft's cloud computing platform. Public clouds need to be extra vigilant about security operations because all assets are hosted on the internet and cloud resources fluctuate in their availability daily and sometimes unpredictably.
Azure provides the resource changes and service logs through Event Hubs. Event Hubs is a service that helps you collect, transform, store, and process large amounts of data and stream it in real time. It also provides activity logs to audit API usage, metrics for managing essential performance indicators, and APIs to manage lists and settings of cloud resources.
Logpresso enables unified cloud compliance monitoring via the Azure API.
Prerequisites
Users should understand the services provided by Microsoft Azure and be able to set up the necessary services they need on their own.
- Microsoft Entra ID
- Event Hubs
- Azure Web Application Firewall
- Azure Firewall
- Azure Front Door and CDN
- Event retention
Register Logpresso App on the Azure Portal
Step 1. Register your Logpresso app with Microsoft Entra ID
Login to Azure Portal and register the Logpresso app with the Microsoft Entra ID. This app will process incoming requests from Logpresso Sonar.
- Go to Microsoft Entra ID > Manage > App registrations page. Click + New registration to register a new app.
- Enter a display name for your application. Then, select a supported account type. Once all are correctly entered, click Register.
- When the registration finishes, click the app name on the list to see the Application (client) ID and the Directory (tenant) ID. Make sure to copy this information and store it in a secure place. The application ID and directory ID are later required to configure an Azure connection profile on Logpresso.
The next step is setting up secrets and APIs for communication, and access controls for the app.
Step 2. Client Secrets
Create a client secret for Logpresso Sonar to communicate via the REST API.
Go to Manage > Certificates & Secrets > New client secret and click the Add button in the Add a client secret panel.
-
Description can be left empty.
-
Specify Expires (expiration) according to your organization’s security policy.
-
Value is a secret string. Once you leave this screen, you will not be able to retrieve it, so copy the string and keep it secure. The Secret is required when you set up your Azure connection profile on Logpresso.
Step 3. API Permissions
In Manage > API Permissions, configure the necessary API permissions for the Logpresso app. Permissions for Azure Key Vault and Azure Service Management are required:
- On the API permissions screen, click Add a permission.
- In the Request API permissions panel, choose the Azure Key Vault card.
- Click Delegated permissions to select user_impersonation, and then click Add permissions.
- Add the same permission for the Azure Service Management API.
- Click Grant admin consent for .... A confirmation window will appear. Click Yes to continue. If the Status updates as shown in the following figure (Granted for Logpresso Inc), the setup is completed.
Step 4. Subscription ID
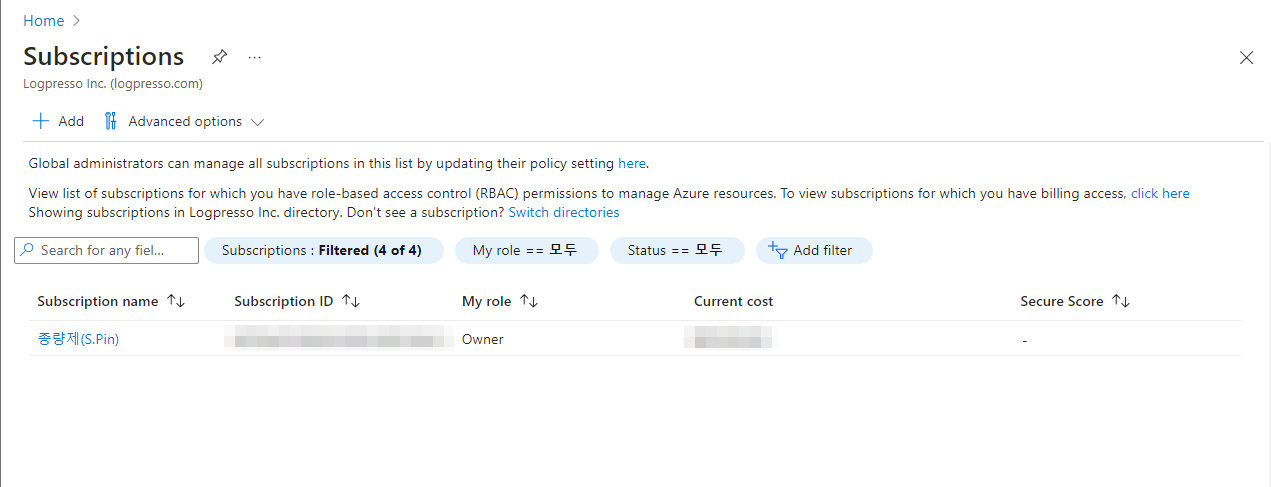
- Go to Home > Subscriptions.
- From the displayed subscription information, copy the ID of the subscription you want to grant access to the Logpresso app and store it in a secure place. The subscription ID is later required to configure an Azure connect profile on Logpresso.
Step 5. Access Control (IAM)
Set up the access control for the Logpresso app.
- Click the name of the subscription and go to the Access control (IAM) menu.
- Navigate to the Role assignment tab and then assign the Reader role to the Logpresso app.
Configure Event Hubs
The Microsoft Azure app installed on Logpresso Sonar receives logs collected in event hubs registered with the Event Hubs service. The Event Hubs is the name of the service to manage event hubs, each of which we'll call an “entity” to avoid confusion with the service's name.
Step 1. Firewall Outbound Rule
See the following articles to add a firewall outbound rule:
- Azure Event Hubs FAQ: What ports do I need to open on the firewall?
- Azure Event Hubs FAQ: What IP addresses do I need to allow?
Step 2. Add Entity
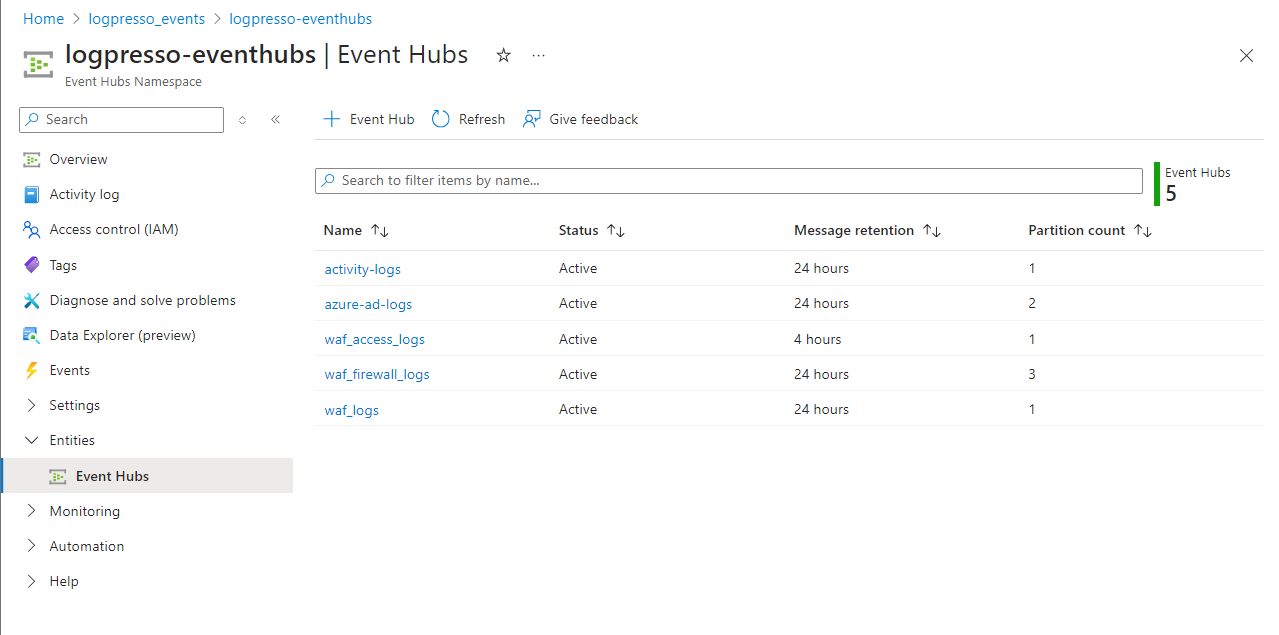
You will need an entity (event hub) to receive logs from the source. Register below five entities in the Event Hubs namespace (in this case, logpresso-eventhubs). The administrator can change the entity names.
- activity-logs: For Azure audit logs
- azure-ad-logs: For Microsoft Entra ID logs
- firewall_logs: For Azure Firewall logs
- front_door_logs: For Front Door and CDN logs
- waf_logs: For Azure WAF logs
Step 3. Shared Access Policies
Configure the shared access policy for each entity.
Note that the shared access policy must be configured individually for each entity; The shared access policy you'll set here is the per-entity shared access policy, not the global shared access policy for the Event Hubs namespace.
The following instructions detail how to configure a shared access policy for the activity-logs entity. Follow the same steps for the other entities as well.
- In the logpresso-eventhubs namespace, click the entity name under Entities > Event Hubs.
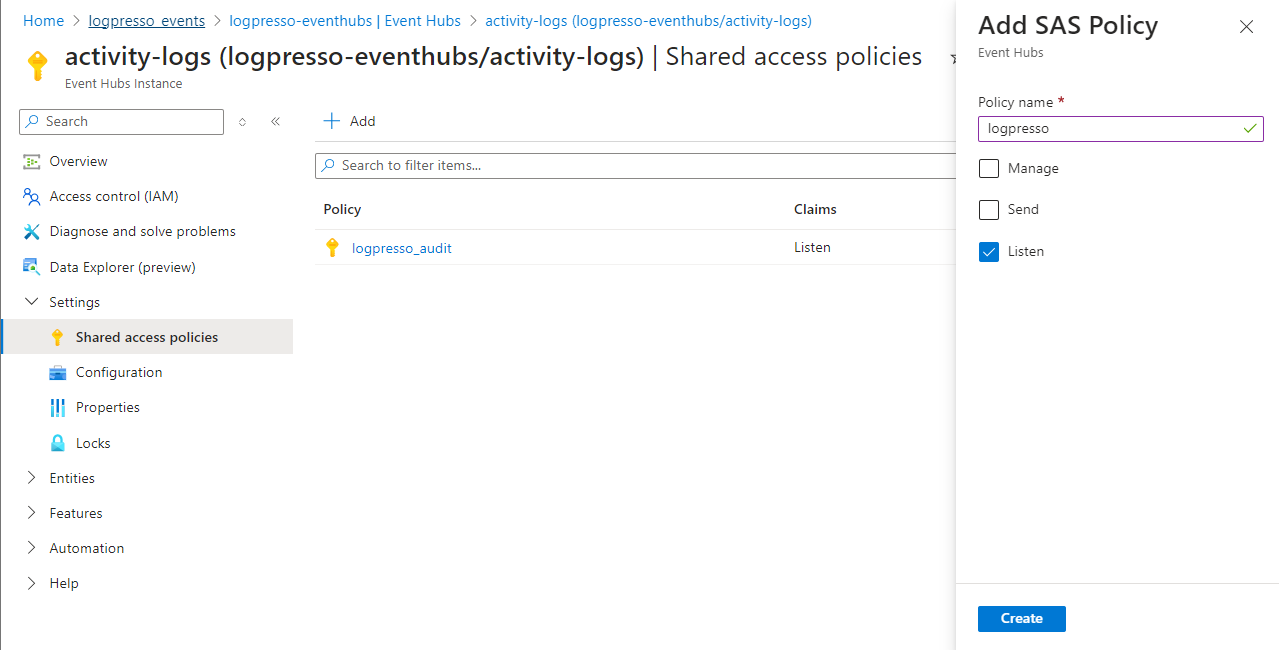
- Navigate to Settings > Shared Access Policies and click Add entity.
- On the Add SAS Policy panel, enter policy name, select Listen, and then Click Create to save the policy.
- Once the policy is created, select it to view the Connection String - Primary Key. Copy this key and store it securely. It will be required when setting up the Azure Event Hubs connect profile on Logpresso.
- Repeat these steps for each of the four entities (activity-logs, azure-ad-logs, firewall_logs, and waf_logs) to ensure each entity has an individually configured shared access policy.
Configure Diagnostic Settings
In this step, configure diagnostic settings to route logs from each service (subscription) to the Event Hub entities created earlier. Use the global shared access policy RootManageSharedAccessKey for the namespace configured in Event Hubs. The entity-specific shared access policies configured earlier are reserved for the connect profiles in Logpresso Sonar.
Diagnostic Settings for the Activity Log
You can view activity logs on the Monitor menu. Navigate to the Monitor > Activity log > Diagnostic settings, then click the Add diagnostic settings.
- On the Diagnostic settings page, select the logs you want to stream to the event hub.
- Check the Stream to an event hub box, then specify the Subscription, Event hub namespace, optional Event hub name, and Event hub policy name.
- Once all are specified, click the Save button.
Entra ID Diagnostic Settings
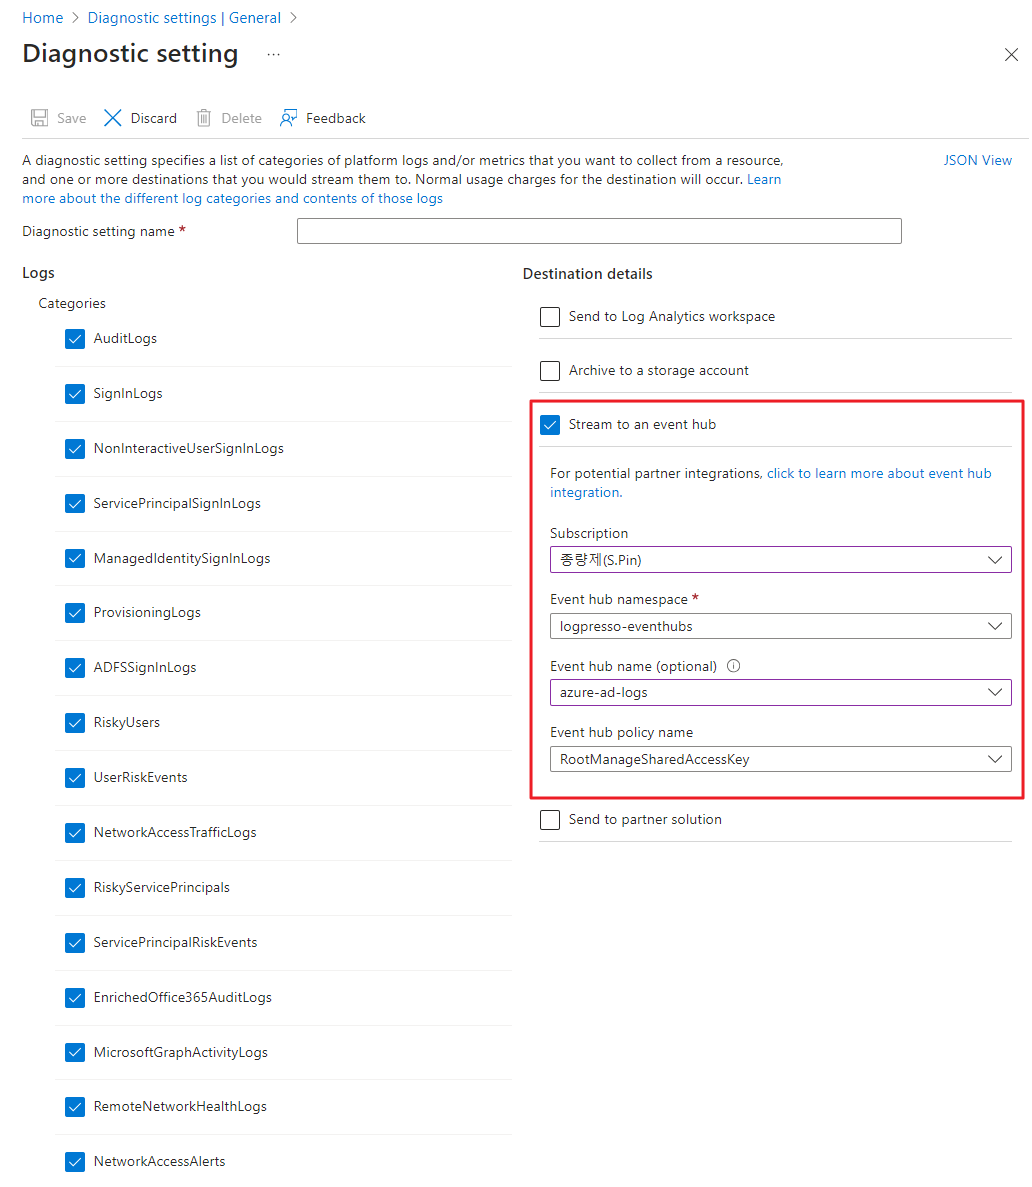
From the Entra ID page, navigate to the Monitoring > Diagnostic settings menu, then click the Add diagnostic settings.
- On the Diagnostic settings page, select the logs you want to stream to the event hub.
- Check the Stream to an event hub box**,** then specify the Subscription, Event hub namespace, optional Event hub name, and Event hub policy name.
- Once all are specified, click the Save button.
Diagnostic Settings for the Azure Firewall
From the Azure Firewall page, navigate to the Monitoring > Diagnostic settings menu, then click the Add diagnostic settings.
- On the Diagnostic settings page, select the logs you want to stream to the event hub.
- Check the Stream to an event hub box,** then specify the Subscription, Event hub namespace, optional Event hub name, and Event hub policy name.
- Once all are specified, click the Save button.
Diagnostic Settings for Application Gateway
On the Application Gateway page, select the firewall for which you want to configure diagnostic settings. Navigate to the Monitoring > Diagnostic settings menu, then click the Add diagnostic settings.
- On the Diagnostic settings page, select the logs you want to stream to the event hub.
- Check the Stream to an event hub box, then specify the Subscription, Event hub namespace, optional Event hub name, and Event hub policy name.
- Once all are specified, click the Save button.
Front Door and CDN Profiles Diagnostic Settings
From the Front Door and CDN profiles page, navigate to the Monitoring > Diagnostic settings menu, then click the Add diagnostic settings.
- On the Diagnostic settings page, select the logs you want to stream to the event hub.
- Check the Stream to an event hub box, then specify the Subscription, Event hub namespace, optional Event hub name, and Event hub policy name.
- Once all are specified, click the Save button.
Set Up Logpresso Loggers
Step 1. Add connect profiles (see the article for more details).
Azure Connect Profile
The following fields are required.
- Name: Provide a unique name to identify the connect profile.
- Identifier: Provide a unique identifier for the connect profile.
- Type:
Azure - Subscription ID: Azure subscription ID
- Client ID: Client ID registered in Entra ID
- Tenant ID: Azure tenant ID
Azure Event Hubs Connect Profile
Create four Azure Event Hubs access profiles—one for each entity configured in Event Hubs.
The following fields are required.
- Name: Provide a unique name to identify the connect profile.
- Identifier: Provide a unique identifier for the connect profile.
- Type:
Azure Event Hubs - Connection String: A value defined in Connection String - Primary Key from the shared access policy configured for each individual entity in Event Hub. Each entity has a unique connection string.
Step 2. Configure Loggers
Microsoft Azure requires 4 different loggers.
Logger Settings for Azure Activity Logs
The following fields are required.
- Name: Provide a unique name to identify the logger.
- Interval: 5 sec.
- Storage: Select a node based on the platform configuration.
- Logger Model:
Azure Activity Logs - Table:
AZURE_ACTIVITY_LOGS - Connect Profile: Connect profile identifier
- Start Time: The time at which logs are collected after the logger's initial operation and initialization.
Logger Settings for Azure Firewall Logs
The following fields are required.
- Name: Provide a unique name to identify the logger.
- Interval: 5 sec.
- Storage: Select a node based on the platform configuration.
- Logger Model:
Azure Firewall - Table:
AZURE_FIREWALL_LOGS - Connect Profile: Connect profile identifier
- Start Time: The time at which logs are collected after the logger's initial operation and initialization.
Logger Settings for Azure WAF Logs
The following fields are required.
- Name: Provide a unique name to identify the logger.
- Interval: 5 sec.
- Storage: Select a node based on the platform configuration.
- Logger Model:
Azure WAF - Table:
AZURE_WAF_LOGS - Connect Profile: Connect profile identifier
- Start Time: The time at which logs are collected after the logger's initial operation and initialization.
logger Settings for Microsoft Entra ID Logs
The following fields are required.
- Name: Provide a unique name to identify the logger.
- Interval: 5 sec.
- Storage: Select a node based on the platform configuration.
- Logger Model:
Microsoft Entra ID - Table:
MS_ENTRA_ID_LOGS - Connect Profile: Connect profile identifier
- Start Time: The time at which logs are collected after the logger's initial operation and initialization.
Logger Settings for Azure Front Door Logs
The following fields are required.
- Name: Provide a unique name to identify the logger.
- Interval: 5 sec.
- Storage: Select a node based on the platform configuration.
- Logger Model:
Azure Front Door - Table:
AZURE_FRONT_DOOR - Connect Profile: Connect profile identifier
- Start Time: The time at which logs are collected after the logger's initial operation and initialization.
Installation Completed
Now that you've finished installing and setting up your Azure app, check loggers on the Logger menu to make sure data is being correctly received.


